说到微服务,自然就少不了保证服务之间数据一致性的分布式事务,所以本篇就以Seata的AT模式如何在微服务的实际场景中应用进行实战说明,希望大家都能有个看其形知其意的效果。
Seata分布式事务在线体验地址: www.youlai.store

本篇完整源码地址:https://github.com/hxrui/youlai-mall
有想加入开源项目开发的童鞋也可以联系我(微信号:haoxianrui),希望大家能够一起交流学习。觉得项目对你有帮助希望能给一个star或者关注,持续更新中。。。
一. 前言
相信了解过开源项目 youlai-mall 的童鞋应该知道该项目主要是基于Spring Cloud + Vue等当前最新最主流技术落地实现的一套微服务架构 + 前后端分离的全栈商城系统(App、微信小程序等)。
往期文章链接:
微服务
- Spring Cloud实战 | 第一篇:Windows搭建Nacos服务
- Spring Cloud实战 | 第二篇:Spring Cloud整合Nacos实现注册中心
- Spring Cloud实战 | 第三篇:Spring Cloud整合Nacos实现配置中心
- Spring Cloud实战 | 第四篇:Spring Cloud整合Gateway实现API网关
- Spring Cloud实战 | 第五篇:Spring Cloud整合OpenFeign实现微服务之间的调用
- Spring Cloud实战 | 第六篇:Spring Cloud Gateway+Spring Security OAuth2+JWT实现微服务统一认证授权
- Spring Cloud实战 | 最七篇:Spring Cloud Gateway+Spring Security OAuth2集成统一认证授权平台下实现注销使JWT失效方案
- Spring Cloud实战 | 最八篇:Spring Cloud +Spring Security OAuth2+ Vue前后端分离模式下无感知刷新实现JWT续期
- Spring Cloud实战 | 最九篇:Spring Security OAuth2认证服务器统一认证自定义异常处理
管理前端
- vue-element-admin实战 | 第一篇: 移除mock接入后台,搭建有来商城youlai-mall前后端分离管理平台
- vue-element-admin实战 | 第二篇: 最小改动接入后台实现根据权限动态加载菜单
微信小程序
- vue+uniapp商城实战 | 第一篇:【有来小店】微信小程序快速开发接入Spring Cloud OAuth2认证中心完成授权登录
部署篇
Docker实战 | 第二篇:IDEA集成Docker插件实现一键自动打包部署微服务项目,一劳永逸的技术手段值得一试
Docker实战 | 第三篇:Docker安装Nginx,实现基于vue-element-admin框架构建的项目线上部署
说到微服务,自然就少不了保证服务之间数据一致性的分布式事务,所以本篇就以Seata的AT模式如何在微服务的实际场景中应用进行实战说明,希望大家都能有个看其形知其意的效果。
1. 需求描述
会员提交订单,扣减商品库存,增加会员积分,完成前面步骤,更改订单状态为已完成。

根据需求可知这其中牵涉到订单、商品、会员3个微服务,分别对应 youlai-mall 商城项目的 mall-oms、mall-pms、mall-ums微服务。
2. 技术版本
| 技术 |
版本 |
说明 |
| Spring Cloud |
Hoxton.SR9 |
微服务架构 |
| Nacos |
1.4.0 |
注册、配置中心 |
| Seata |
1.4.1 |
分布式事务 |
3. 环境准备
3.1 Nacos安装和配置
https://www.cnblogs.com/haoxianrui/p/14059009.html
进入Nacos控制台,创建seata命名空间

记住命名空间ID自定义为seata_namespace_id,后面需要
3.2 Seata数据库创建
创建数据库名为seata,执行Seata的Github官方源码中提供的的MySQL数据库脚本
MySQL脚本地址:
https://github.com/seata/seata/blob/1.4.1/script/server/db/mysql.sql
二. seata-server安装
点击 Docker Hub链接 查看最新Seata版本

可以看到最新版本为1.4.1版本,复制指令获取最新版本镜像
docker pull seataio/seata-server:1.4.1
启动临时容器
docker run -d --name seata -p 8091:8091 seataio/seata-server
从临时容器获取到 registry.conf 配置文件
mkdir /opt/seata
docker cp seata:/seata-server/resources/registry.conf  /etc/seata
修改registry.conf配置,类型选择nacos,namesapce为上文中在nacos新建的命名空间id即seata_namespace_id,精简如下:
vim /opt/seata/registry.conf
registry {
  type = "nacos"
  loadBalance = "RandomLoadBalance"
  loadBalanceVirtualNodes = 10

  nacos {
    application = "seata-server"
    serverAddr = "c.youlai.store:8848"
    namespace = "seata_namespace_id"
    cluster = "default"
  }
}
config {
  type = "nacos"

  nacos {
    serverAddr = "c.youlai.store:8848"
    namespace = "seata_namespace_id"
    group = "SEATA_GROUP"
  }
}
安排好 registry.conf 之后,删除临时容器
docker rm -f seata
接下来着手开始推送Seata依赖配置至Nacos
从Seata的GitHub官方源码获取配置文件(config.txt)和推送脚本文件(nacos/nacos-config.sh)
地址:https://github.com/seata/seata/blob/develop/script/config-center
因为脚本的关系,文件存放目录如下
/opt/seata
├── config.txt
└── nacos
    └── nacos-config.sh
修改配置文件 config.txt
vim /opt/seata/config.txt
修改事务组和MySQL连接信息,修改信息如下:
service.vgroupMapping.mall_tx_group=default

store.mode=db
store.db.driverClassName=com.mysql.cj.jdbc.Driver
store.db.url=jdbc:mysql://www.youlai.store:3306/seata?useUnicode=true&rewriteBatchedStatements=true
store.db.user=root
store.db.password=123456
执行推送命令
cd /opt/seata/nacos

bash nacos-config.sh -h c.youlai.store -p 8848 -g SEATA_GROUP -t seata_namespace_id -u nacos -w nacos
- -t seata_namespace_id 指定Nacos配置命名空间ID
- -g SEATA_GROUP 指定Nacos配置组名称
如果有 init nacos config fail. 报错信息,请检查修改信息,如果有属性修改提示failure,请修改config.txt中属性。
如果出现类似 cat: /tmp/tmp.rRGz1B7MUP: No such file or directory 的错误不用慌,重新执行推送命令直至成功。
推送执行完毕,到Nacos控制台查看配置是否已添加成功

做完上述准备工作之后,接下来最后一步:启动Seata容器
docker run -d --name seata --restart=always -p 8091:8091  \
-e SEATA_IP=c.youlai.store \
-e SEATA_CONFIG_NAME=file:/seata-server/resources/registry.conf \
-v /opt/seata/registry.conf:/seata-server/resources/registry.conf \
-v /opt/seata/logs:/root/logs \
seataio/seata-server
三. Seata客户端
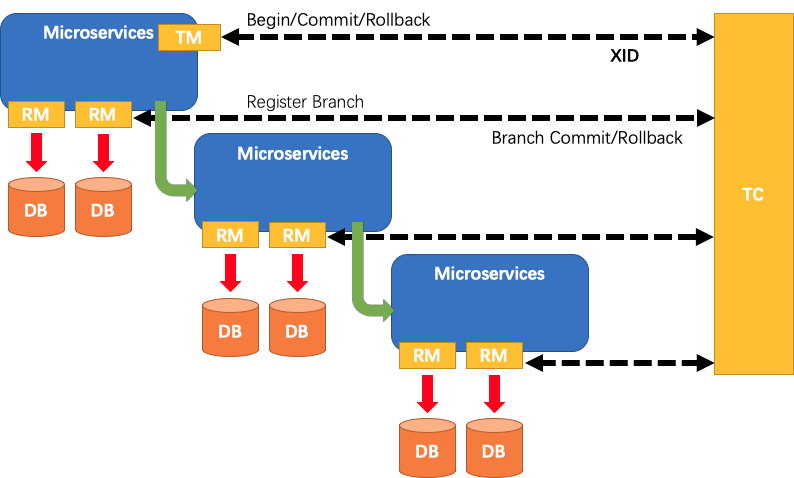
上文完成了Seata服务端应用安装、添加Seata配置至Nacos配置中心以及注册Seata到Nacos注册中心。
接下来的工作就是客户端的配置,通过相关配置把订单(mall-oms)、商品(mall-pms)、会员(mall-ums)这3个微服务关联seata-server。
1. 添加undo_log表
Seata的AT模式下之所以在第一阶段直接提交事务,依赖的是需要在每个RM创建一张undo_log表,记录业务执行前后的数据快照。
如果二阶段需要回滚,直接根据undo_log表回滚,如果执行成功,则在第二阶段删除对应的快照数据。
Seata官方Github源码库undo_log表脚本地址:
https://github.com/seata/seata/blob/1.4.1/script/client/at/db/mysql.sql
注意第一行的注释说明
-- for AT mode you must to init this sql for you business database. the seata server not need it.
CREATE TABLE IF NOT EXISTS `undo_log`
(
    `branch_id`     BIGINT(20)   NOT NULL COMMENT 'branch transaction id',
    `xid`           VARCHAR(100) NOT NULL COMMENT 'global transaction id',
    `context`       VARCHAR(128) NOT NULL COMMENT 'undo_log context,such as serialization',
    `rollback_info` LONGBLOB     NOT NULL COMMENT 'rollback info',
    `log_status`    INT(11)      NOT NULL COMMENT '0:normal status,1:defense status',
    `log_created`   DATETIME(6)  NOT NULL COMMENT 'create datetime',
    `log_modified`  DATETIME(6)  NOT NULL COMMENT 'modify datetime',
    UNIQUE KEY `ux_undo_log` (`xid`, `branch_id`)
) ENGINE = InnoDB
  AUTO_INCREMENT = 1
  DEFAULT CHARSET = utf8 COMMENT ='AT transaction mode undo table';
分别在项目的 mall-oms、mall-pms、mall-ums 的三个数据库执行脚本创建 undo_log 表
2. 添加依赖
分别为 youlai-mall 的 mall-oms、mall-pms、mall-ums 微服务添加如下seata客户端依赖
<dependency>
    <groupId>io.seata</groupId>
    <artifactId>seata-spring-boot-starter</artifactId>
    <version>1.4.0</version>
</dependency>

<dependency>
    <groupId>com.alibaba.cloud</groupId>
    <artifactId>spring-cloud-starter-alibaba-seata</artifactId>
    <exclusions>
        <!-- 排除依赖 指定版本和服务器端一致 -->
        <exclusion>
            <groupId>io.seata</groupId>
            <artifactId>seata-all</artifactId>
        </exclusion>
        <exclusion>
            <groupId>io.seata</groupId>
            <artifactId>seata-spring-boot-starter</artifactId>
        </exclusion>
    </exclusions>
</dependency>

<dependency>
    <groupId>io.seata</groupId>
    <artifactId>seata-all</artifactId>
    <version>1.4.1</version>
</dependency>

<dependency>
    <groupId>io.seata</groupId>
    <artifactId>seata-spring-boot-starter</artifactId>
    <version>1.4.1</version>
</dependency>
- 使用Alibaba官方提供的Spring Cloud和Seata整合好的Spring Boot启动器
spring-cloud-starter-alibaba-seata
- 需要指定seata版本和服务版本一致,这里也就是1.4.1
3. yml配置
Seata官方Github源码库Spring配置链接:
https://github.com/seata/seata/blob/1.4.1/script/client/spring/application.yml
配置精简如下:
# 分布式事务配置
seata:
  tx-service-group: mall_tx_group
  enable-auto-data-source-proxy: true
  registry:
    type: nacos
    nacos:
      server-addr: c.youlai.store:8848
      namespace: seata_namespace_id
      group: SEATA_GROUP
  config:
    type: nacos
    nacos:
      server-addr: c.youlai.store:8848
      namespace: seata_namespace_id
      group: SEATA_GROUP
tx-service-group: mall_tx_group 配置事务群组,其中群组名称 mall_tx_group 需和服务端的配置 service.vgroupMapping.mall_tx_group=default 一致enable-auto-data-source-proxy: true 自动为Seata开启了代理数据源,实现集成对undo_log表操作namespace: seata_namespace_id seata-server一致group: SEATA_GROUP seata-server一致
将精简的配置分别放置到 mall-oms、mall-pms、mall-ums的配置文件中
4. 启动类调整
因为要使用Seata提供的代理数据源,所以在启动类移除SpringBoot自动默认装配的数据源
同样也是需要在3个微服务启动类分别调整,不然分布式事务不会生效
@SpringBootApplication(exclude = DataSourceAutoConfiguration.class)
四. 测试环境模拟
根据上诉步骤完成Seata服务安装以及客户端的配置之后
接下来就开始着手 透过现象看本质 的工作,根据业务需求创建业务表和编写业务代码
1. 业务表
提供业务表关键字段,完整表结构请点击 youlai-mall
订单表(oms_order):
CREATE TABLE `oms_order` (
  `id` bigint NOT NULL AUTO_INCREMENT COMMENT 'id',
  `status` int NOT NULL DEFAULT '101' COMMENT '订单状态【101->待付款;102->用户取消;103->系统取消;201->已付款;202->申请退款;203->已退款;301->待发货;401->已发货;501->用户收货;502->系统收货;901->已完成】',
  PRIMARY KEY (`id`) USING BTREE
) ENGINE=InnoDB DEFAULT CHARSET=utf8mb4 COLLATE=utf8mb4_0900_ai_ci COMMENT='订单表';
库存表(pms_sku):
CREATE TABLE `pms_sku` (
  `id` bigint NOT NULL AUTO_INCREMENT COMMENT '商品id',
  `stock` int NOT NULL DEFAULT '0' COMMENT '库存',
  PRIMARY KEY (`id`)
) ENGINE=InnoDB  DEFAULT CHARSET=utf8mb4 COLLATE=utf8mb4_0900_ai_ci ROW_FORMAT=DYNAMIC COMMENT='商品库存表';
会员表(ums_user):
CREATE TABLE `ums_user` (
  `id` bigint NOT NULL AUTO_INCREMENT,
  `username` varchar(64) CHARACTER SET utf8 COLLATE utf8_general_ci NOT NULL,
  `point` int DEFAULT '0' COMMENT '会员积分',
  PRIMARY KEY (`id`) USING BTREE
) ENGINE=InnoDB  DEFAULT CHARSET=utf8mb4 ROW_FORMAT=DYNAMIC COMMENT='会员信息表';
2. 业务代码
提供核心业务代码,完整代码请点击 youlai-mall
订单微服务(mall-oms):
代码定位:OmsOrderServiceImpl#submit
@Override
@GlobalTransactional(rollbackFor = Exception.class)
public boolean submit() {
    log.info("扣减库存----begin");
    productFeignService.updateStock(1l, -1);
    log.info("扣减库存----end");

    log.info("增加积分----begin");
    memberFeignService.updatePoint(1l, 10);
    log.info("增加积分----end");

    log.info("修改订单状态----begin");
    boolean result = this.update(new LambdaUpdateWrapper<OmsOrder>().eq(OmsOrder::getId, 1l).set(OmsOrder::getStatus, 901));
    log.info("修改订单状态----end");
    return result;
}
- @GlobalTransactional注解,标识TM(事务管理器)开启全局事务
商品微服务(mall-pms):
代码定位:AppSkuController#updateStock
@PutMapping("/{id}/stock")
public Result updateStock(@PathVariable Long id, @RequestParam Integer num) {
    PmsSku sku = iPmsSkuService.getById(id);
    sku.setStock(sku.getStock() + num);
    boolean result = iPmsSkuService.updateById(sku);
    return Result.status(result);
}
会员微服务(mall-ums):
 @PutMapping("/{id}/point")
public Result updatePoint(@PathVariable Long id, @RequestParam Integer num) {
    UmsUser user = iUmsUserService.getById(id);
    user.setPoint(user.getPoint() + num);
    boolean result = iUmsUserService.updateById(user);
    try {
        Thread.sleep(15 * 1000);
    } catch (InterruptedException e) {
        e.printStackTrace();
    }
    return Result.status(result);
}
Thread.sleep(15 * 1000); 模拟超时异常验证事务是否能正常回滚
注意15s的设定有讲究的
先看下订单微服务的feign调用配置,
ribbon:
  ReadTimeout: 10000
feign底层使用ribbon做负载均衡和远程调用,上面设置ribbon的超时时间为10s
然而在订单调用会员服务的时候需要至少15s才能获得结果,显然会造成接口请求超时的异常,接下来就看事务能不能进行正常回滚。
五. 验证测试
本篇源码包括测试用例均已整合到 youlai-mall ,大家有条件的话可以搭建一个本地环境调试一下,项目从无到有的搭建参考项目中的说明文档。
但如果你想快速验证Seata分布式事务和看到效果,ok,满足你,在项目中添加了一个 实验室 的菜单,计划用于技术点测试,也方便给大家提供一个完整的测试环境。
话不多说,看界面效果图:
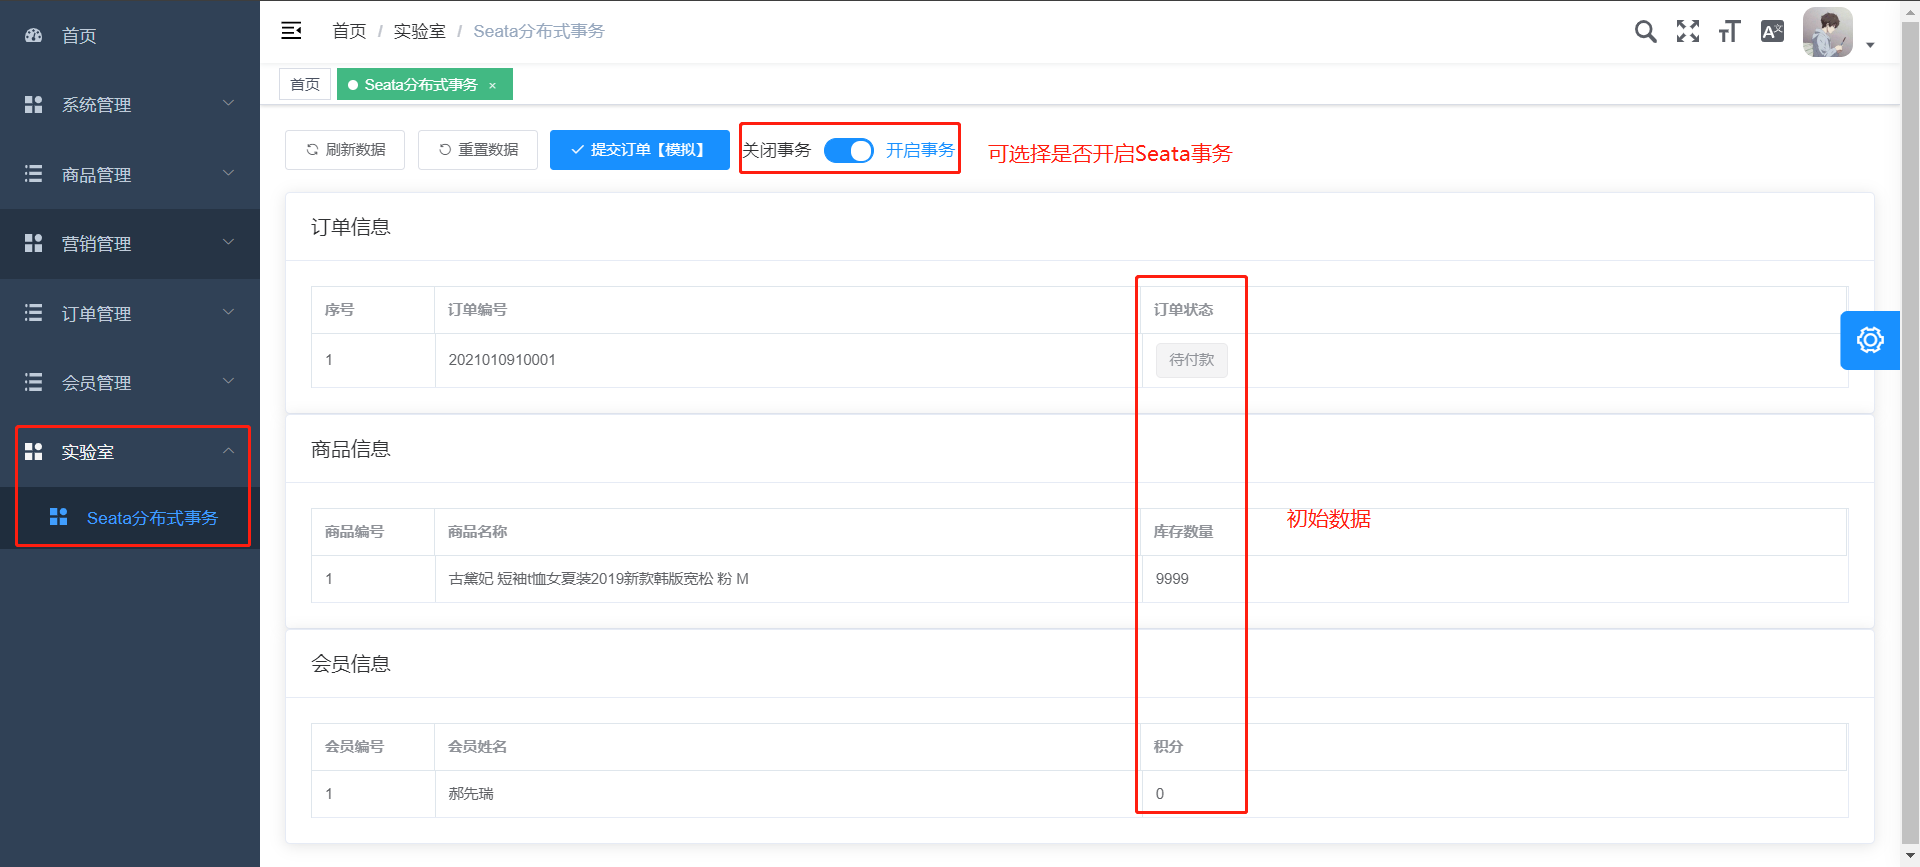
看完上图标注的地方,接下来通过界面来进行分布式事务测试
首先确定一下前提订单提交肯定会因为会员积分服务超时出现异常

可以看到在关闭事务提交订单异常的情况下,库存和积分更新成功了,然而订单确更新失败了
接下来再看下开启事务提交的结果又会是如何呢?

更新订单状态失败,因开启了全局事务,导致已更新的商品库存、积分被回滚至初始状态。
六. 结语
以上就Seata分布式事务结合实际场景应用的案例进行整合和测试,最后可以看到通过Seata实现了微服务调用链的最终数据一致性。最后提供了在线体验实验室功能模块,大家可以拉取到本地然后断点调试以及监听数据表的数据变化,相信应该会很快掌握Seata的执行流程和实现原理。
最后,觉得项目不错的话或对你有帮助的话,希望能给个star,持续更新中...