我们在开发spring boot web项目的时候,视图层功能都需要使用jsp,这个时候我们会发现一个问题,这个jsp页面非常的原始,没有办法使用复杂的标签,我们需要写最原始的java+jsp的混写方式来写业务代码。用起来很不方便,为了方便我们需要导入jsp中第三方标签库,来简化这些视图层的业务代码。那么都是要导入第三方标签库来写代码,我们为什么不一步到位直接使用spring boot 给我推荐的Thymeleaf 模板库中的标签来写代码呢?它们的功能都是做一样的事情,就是标签化==html(jsp页面)==中的业务逻辑。所以为了简化开发,我们可以将项目变成使用Thymeleaf 模板形式的项目而不用繁琐的web模式来开发项目。
所以现在大部分spring boot开发web服务功能的时候,都不会选择web + jsp模式,除非对兼容性和特殊功能上有要求的时候我们才会选择web + jsp模式。
Thymeleaf模式在开发上要比web + jsp模式简单需要,项目搭建也非常的简单。可以做到快速上手的本人十分推荐这个模式。我们使用 Thymeleaf 作为页面模板,我们可以使用Thymeleaf 自带的逻辑标签进行页面开发,大家可以参考这篇文章来进行页面开发。
<dependency>
   <groupId>org.springframework.boot</groupId>
   <artifactId>spring-boot-starter-thymeleaf</artifactId>
   <version>2.2.3.RELEASE</version>
</dependency>
<dependency>
  <groupId>org.thymeleaf</groupId>
  <artifactId>thymeleaf</artifactId>
  <version>3.0.11.RELEASE</version>
</dependency>
所有例子代码百度网盘:https://pan.baidu.com/s/1rDpcZtdBA6i7vBmYTMwcUA
提取码:1234
数据库下载地址百度网盘:https://pan.baidu.com/s/1Q6pbC2SR70HKCeVXgOGUPQ
提取码:1234
下载mysql51数据库
例子下载maven创建springboot+ThymeleafMVC项目.zip
例子下载 普通项目springboot+ThymeleafMVC项.zip
1 Thymeleaf项目结构
Thymeleaf项目结构与web+jsp项目结构不一样。所有的模板html页面到保存在templates这个目录下,成为Thymeleaf模板页之后我们就可以使用Thymeleaf标签开进行业务开发。
- 创建templates文件夹 模板页面保存默认目录地址
- 创建static文件夹 所有静态资源保存目录地址(css,js,图片,html)
普通项目结构
Project
   └─src
      └─templates
      └─static
maven项目
- resources templates目录和 static目录都在resources 目录下
Project
└─src
   └─main
      └─ resources
            └─templates
            └─static
静态资源设置
在application.yml文件中设置静态资源。这样就可以使用static文件目录下的所有静态资源了。
spring:
  mvc:
    static-path-pattern: /static/**
2 创建Thymeleaf Controller容器与html模板
创建Controller容器
@Controller
@RequestMapping("/zht")
public class ZhtController {
	@RequestMapping("/index")
	 public String index(Model map,String test) {
		System.out.println("===========测试访问到了===========");
		System.out.println("===========测试 test value "+test+"===========");
		map.addAttribute("name", "欢迎来到 templates 页面");
	   return "/index";
	 }
}
创建index.html模板 src/resources/templates/index.html
普通项目地址是 src/templates/index.html
<html>
<head>
<meta http-equiv="Content-Type"
      content="text/html; charset=utf-8" />
<title>web页面</title>
<link rel="stylesheet" href="../static/css/css.css" />
<style type="text/css">
</style>
</head>
<body th:inline="text">
欢迎来到[(${name})]
</body>
</html>
在浏览器中输入 http://localhost:9089/zht/index 查看效果

3 thymeleaf 单体测试
测试内容与web jsp单体测试一样。
MyUrlPageTest
@RunWith(SpringRunner.class)
@SpringBootTest(classes=OnApp.class)
@AutoConfigureMockMvc
public class MyUrlPageTest {
@Autowired
private WebApplicationContext webapp;
private MockMvc mockMvc;
@Before
public void setup() {
mockMvc = MockMvcBuilders.webAppContextSetup(webapp).build();
}
@Test
public void TestPage() throws Exception{
ResultActions results =mockMvc.
perform(MockMvcRequestBuilders
.get("/zht/index").param("test", "测试数据来了"));
results.andReturn().getResponse()
.setCharacterEncoding("UTF-8");
results.
andExpect(MockMvcResultMatchers.status().isOk())
.andDo(MockMvcResultHandlers.print());
}
}
测试结果
===========测试访问到了===========
===========测试 test value 测试数据来了===========
MockHttpServletRequest:
      HTTP Method = GET
      Request URI = /zht/index
       Parameters = {test=[测试数据来了]}
          Headers = []
             Body = <no character encoding set>
    Session Attrs = {}
ModelAndView:
        View name = /index
             View = null
        Attribute = name
            value = 欢迎来到 templates 页面
MockHttpServletResponse:
           Status = 200
    Error message = null
          Headers = [Content-Language:"en", Content-Type:"text/html;charset=UTF-8"]
     Content type = text/html;charset=UTF-8
             Body = <html>
<head>
<meta http-equiv="Content-Type" content="text/html; charset=utf-8" />
<title>web页面</title>
<link rel="stylesheet" href="../static/css/css.css" />
<style type="text/css">
</style>
</head>
<body>
欢迎来到欢迎来到 templates 页面
</body>
</html>
在测试中能看到Thymeleaf模板生产的结果,我们在开发的时候可以使用测试来调试Thymeleaf模板标签内容。
Thymeleaf模板标签请看:
(项目实战干货)Spring boot 中Thymeleaf 模板 html 标签使用
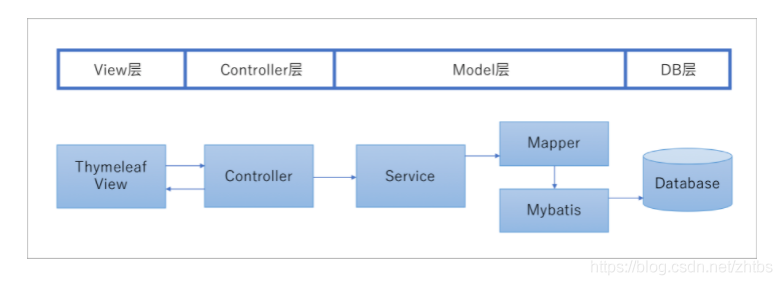
Spring boot 项目的MVC结构
在开发WEB项目的时候,我们一定使用到经典的mvc模式,spring boot容器中会对应不同的mvc层次,我们在对象的层次中创建对应的java类。让我们一起做一个样本。此示例是一个典型的 Spring MVC Web 应用程序用到MySQL 操作。
MVC对应图
- 创建service包 cn.core.my.app.service 老的叫法bo层
- 创建mapper包 cn.core.my.app.mapper 老的叫法dao层
1 数据Model层
在mapper文件下创建创建mybatis配置sql文件配置文件。mybatis不太熟悉的可以看我前几篇关于mybatis介绍文章。
数据库表
CREATE TABLE `user` (
  `id` int(11) DEFAULT NULL,
  `user` varchar(255) COLLATE utf8_bin DEFAULT NULL
) ENGINE=MyISAM DEFAULT CHARSET=utf8 COLLATE=utf8_bin;
UserSql.xml
<?xml version="1.0" encoding="UTF-8" ?>
<!DOCTYPE mapper
 PUBLIC "-//mybatis.org//DTD Mapper 3.0//EN"
 "http://mybatis.org/dtd/mybatis-3-mapper.dtd">
<mapper namespace="cn.core.my.app.mapper.UserDao">
	<select id="addlist" resultType="map">
		select * from user
	</select>
</mapper>
UserDao类
package cn.core.my.app.mapper;
@Mapper
public interface UserDao {
	 List<Map> addlist(Map map);
}
UserService类
package cn.core.my.app.service;
@Service
public class UserService {
    @Autowired
    UserDao user;
    public List getOne(Map map){
        return user