当前位置 博文首页 > 落叶霞枫的博客:安卓开发,NFC读取NFC标签ID,包含Dome和个人见

    落叶霞枫的博客:安卓开发,NFC读取NFC标签ID,包含Dome和个人见

    作者:[db:作者] 时间:2021-07-19 13:27

    安卓开发,NFC读取NFC标签ID,包含Dome和个人见解。

    首先放上谷歌开发文档对NFC的介绍,刚了解NFC开发的可以去看一下NFC文档。

    第一步想要实现的肯定是通过NFC标签调用起我们的Dome,这也是我们日常用其他NFC的基础操作。
    通过学习文档,我们得知NFC的调用是通过过滤器来实现的在安装软件时就会记录下软件所能过滤的NFC类型。

    一共有三种过滤器:
    一、ACTION_NDEF_DISCOVERED
    二、ACTION_TECH_DISCOVERED
    三、ACTION_TAG_DISCOVERED

    主要区别可以研究文档,大体上就是设置上的差别,优先级的差别(优先级顺序为一二三),和读写部分代码的差别。

    这次我使用的第二种ACTION_TECH_DISCOVERED来实现的Dome。下面教大家配置ACTION_TECH_DISCOVERED

    首先在清单文件中配置权限

    <uses-permission android:name="android.permission.NFC" />
    <uses-feature android:name="android.hardware.nfc" android:required="true" />
    

    然后在想要调起跳转的页面的Activity的清单配置中加入过滤器

    <application
            android:allowBackup="true"
            android:icon="@mipmap/ic_launcher"
            android:label="@string/app_name"
            android:roundIcon="@mipmap/ic_launcher_round"
            android:supportsRtl="true"
            android:theme="@style/Theme.NfcTest">
            <activity android:name=".MainActivity"
                android:launchMode="singleTop">
                <intent-filter>
                    <action android:name="android.intent.action.MAIN" />
                    <category android:name="android.intent.category.LAUNCHER" />
                </intent-filter>
                <intent-filter>
                    <action android:name="android.nfc.action.TECH_DISCOVERED" />
                </intent-filter>
                <meta-data
                    android:name="android.nfc.action.TECH_DISCOVERED"
                    android:resource="@xml/nfc_tech_filter" />
            </activity>
        </application>
    

    这里有一个地方需要强调,就是android:launchMode=“singleTop”,虽然后面在创建NFC基类的时候会通过addFlags加上,但不知道为什么不起作用,所以还是直接在清单里加上比较方便,不然软件就会在扫描到一次标签就打开一个新页面放入栈中。

    随后就是针对android:resource="@xml/nfc_tech_filter"的配置,在res下创建xml文件夹,有就不用,然后在文件夹里新建File,名称为nfc_tech_filter.xml。然后放入以下代码。

    <resources xmlns:xliff="urn:oasis:names:tc:xliff:document:1.2">
        <tech-list>
            <tech>android.nfc.tech.IsoDep</tech>
        </tech-list>
        <tech-list>
            <tech>android.nfc.tech.NfcA</tech>
        </tech-list>
        <tech-list>
            <tech>android.nfc.tech.NfcB</tech>
        </tech-list>
        <tech-list>
            <tech>android.nfc.tech.NfcF</tech>
        </tech-list>
        <tech-list>
            <tech>android.nfc.tech.NfcV</tech>
        </tech-list>
        <tech-list>
            <tech>android.nfc.tech.Ndef</tech>
        </tech-list>
        <tech-list>
            <tech>android.nfc.tech.NdefFormatable</tech>
        </tech-list>
        <tech-list>
            <tech>android.nfc.tech.MifareUltralight</tech>
        </tech-list>
        <tech-list>
            <tech>android.nfc.tech.MifareClassic</tech>
        </tech-list>
    </resources>
    

    这部分比较简单,每个tech-list就是一种类型的过滤,这个包含了tech所能支持的所有类型。基本上正常的标签靠近,都能调起Dome,我自己试了四种都可以。

    接下来就是主要的工作代码了,由于是读取Dome所以比较简单,目标是读取到标签上的ID就算成功。

    首先创建BaseNfcActivity.java

    package com.example.nfctest;
    
    import android.app.PendingIntent;
    import android.content.Intent;
    import android.nfc.NdefMessage;
    import android.nfc.NfcAdapter;
    import android.nfc.Tag;
    import android.os.Parcelable;
    import android.provider.Settings;
    import android.util.Log;
    import android.widget.Toast;
    
    import androidx.appcompat.app.AppCompatActivity;
    
    public class BaseNfcActivity extends AppCompatActivity {
    
        private NfcAdapter mNfcAdapter;
        private PendingIntent mPendingIntent;
        @Override
        protected void onStart() {
            super.onStart();
            mNfcAdapter= NfcAdapter.getDefaultAdapter(this);//设备的NfcAdapter对象
            if(mNfcAdapter==null){//判断设备是否支持NFC功能
                Toast.makeText(this,"设备不支持NFC功能!",Toast.LENGTH_SHORT);
                finish();
                return;
            }
            if (!mNfcAdapter.isEnabled()){//判断设备NFC功能是否打开
                Toast.makeText(this,"请到系统设置中打开NFC功能!",Toast.LENGTH_SHORT);
                finish();
                return;
            }
            mPendingIntent= PendingIntent.getActivity(this,0,new Intent(this,getClass()).addFlags(Intent.FLAG_ACTIVITY_SINGLE_TOP),0);//创建PendingIntent对象,当检测到一个Tag标签就会执行此Intent
            Log.d("myNFC","NFC is start");
        }
    
        //页面获取焦点
        @Override
        protected void onResume() {
            super.onResume();
            if (mNfcAdapter!=null){
                mNfcAdapter.enableForegroundDispatch(this,mPendingIntent,null,null);//打开前台发布系统,使页面优于其它nfc处理.当检测到一个Tag标签就会执行mPendingItent
                Log.d("myNFC","onResume");
            }
        }
    
        //页面失去焦点
        @Override
        protected void onPause() {
            super.onPause();
            if(mNfcAdapter!=null){
                mNfcAdapter.disableForegroundDispatch(this);//关闭前台发布系统
            }
        }
        
    	//也是工具不过我没用上。
        public static String flipHexStr(String s) {
            StringBuilder result = new StringBuilder();
            for (int i = 0; i <= s.length() - 2; i = i + 2) {
                result.append(new StringBuilder(s.substring(i, i + 2)).reverse());
            }
            return result.reverse().toString();
        }
        
    	//工具,十六进制转十进制用的
        String ByteArrayToHexString(byte[] inarray) {
            int i, j, in;
            String[] hex = { "0", "1", "2", "3", "4", "5", "6", "7", "8", "9", "A",
                    "B", "C", "D", "E", "F" };
            String out = "";
    
            for (j = 0; j < inarray.length; ++j) {
                in = (int) inarray[j] & 0xff;
                i = (in >> 4) & 0x0f;
                out += hex[i];
                i = in & 0x0f;
                out += hex[i];
            }
            return out;
        }
    }


    然后就是MainActivity.java,让它继承刚刚写的BaseNfcActivity。

    package com.example.nfctest;
    
    import android.content.Intent;
    import android.nfc.NdefMessage;
    import android.nfc.NfcAdapter;
    import android.nfc.Tag;
    import android.os.Bundle;
    import android.os.Parcelable;
    import android.util.Log;
    import android.widget.TextView;
    
    public class MainActivity extends BaseNfcActivity {
        TextView content;
    
        @Override
        protected void onCreate(Bundle savedInstanceState) {
            super.onCreate(savedInstanceState);
            setContentView(R.layout.activity_main);
            content = findViewById(R.id.content);
        }
    
    
        @Override
        protected void onNewIntent(Intent intent) {
            super.onNewIntent(intent);
            if(NfcAdapter.ACTION_TAG_DISCOVERED.equals(intent.getAction())){
                Tag tag = intent.getParcelableExtra(NfcAdapter.EXTRA_TAG);
    //            Long cardId = Long.parseLong(flipHexStr(ByteArrayToHexString(tag.getId())), 16);
    //            Long cardId = Long.parseLong(ByteArrayToHexString(tag.getId()), 16);
                String cardId = ByteArrayToHexString(tag.getId());
                content.setText(cardId.toString());
            }
            Log.d("myNFC",intent.toString());
        }
    }
    

    可以看到比较短,如果之前已经看了写NFC文章的,应该知道NFC被扫描到之后不关是从桌面还是其他地方或者此应用,都会执行onNewIntent方法,而且传过来的intent中包含了标签中的数据。通过Tag获取再从Tag中获取ID。

    layout代码虽然简单,但也放一下,方便大家!

    <?xml version="1.0" encoding="utf-8"?>
    <androidx.constraintlayout.widget.ConstraintLayout xmlns:android="http://schemas.android.com/apk/res/android"
        xmlns:app="http://schemas.android.com/apk/res-auto"
        xmlns:tools="http://schemas.android.com/tools"
        android:layout_width="match_parent"
        android:layout_height="match_parent"
        tools:context=".MainActivity">
    
    
        <TextView
            android:layout_width="match_parent"
            android:layout_height="match_parent"
            android:id="@+id/content"
            />
    
    </androidx.constraintlayout.widget.ConstraintLayout>
    

    完成上述步骤,运行起来,即可验证手边的标签ID了,ID都是出厂赋予好的,不需要自己写。好了我该去研究如何写入了。一起加油吧。

    不做过多的解释,因为大部分网上都有,只是上传一个简单完整的技术验证。,如果不是开发网上这种现成的工具很多,主要是考虑到包括我自己,需要开发,把这部分技术融入到项目中去!

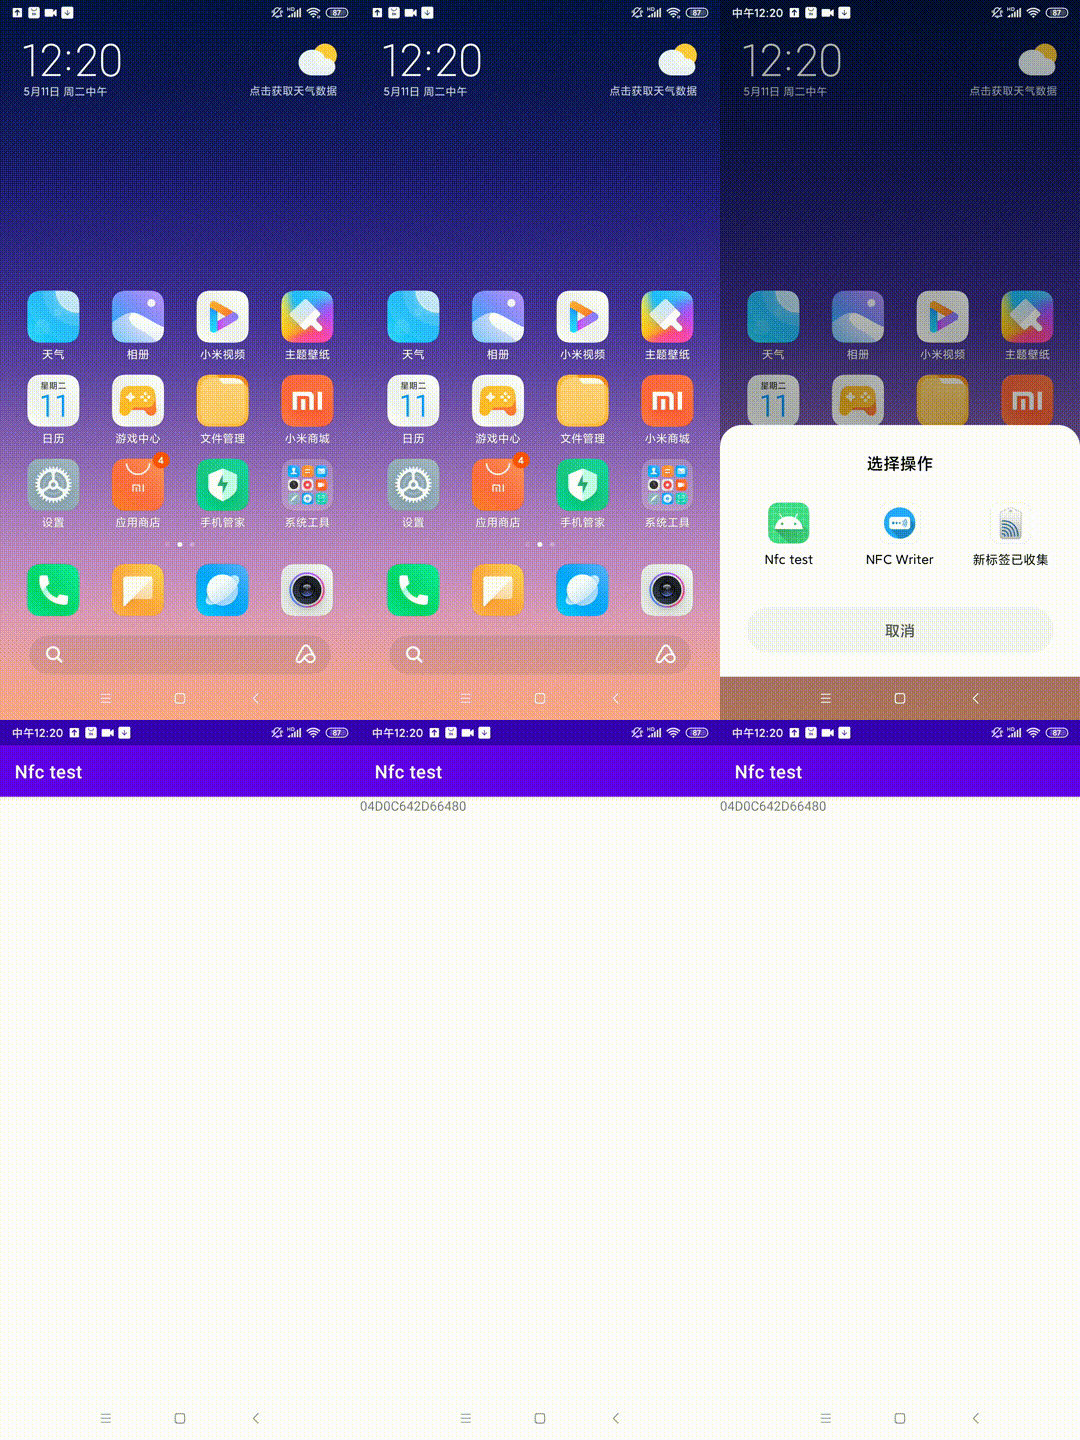
    展示一下吧,ID不是进去就获取到的,而是要调起软件后把标签拿开再放上去才能获取到,毕竟不是一开始就打开,从桌面打开只会执行onStart和onResume,之后在软件界面每次贴都会马上获取到。
    在这里插入图片描述

    (免费)Demo地址:https://download.csdn.net/download/weixin_45920642/19886770

    cs