"python.linting.flake8Enabled": true,
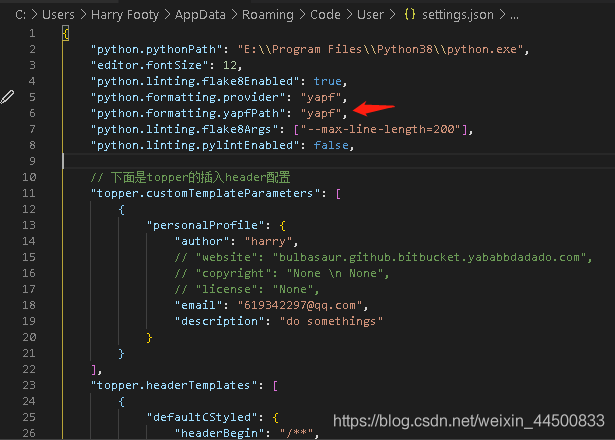
"python.formatting.provider": "yapf",
"python.linting.flake8Args": ["--max-line-length=130"],
"python.linting.pylintEnabled": false

5、按ctrl + 空格键调出相关属性菜单,查看launch.json中的所有属性。

6、关于launch.json、task.json设置的官方文档
https://code.visualstudio.com/docs/editor/debugging#_launch-configurations
https://code.visualstudio.com/docs/editor/variables-reference#_common-questions
6.1、变量引用 -> 预定义变量。
vscode 在 调试、任务配置文件、以及一些选择设置 中 支持 变量引用;
变量引用 在 键值对的字符串中受到支持,在 launch.json、tasks.json文件使用${variableName}语法。
The following predefined variables are supported:
Tip:中文解释所指的“文件”是 vscode 中激活的文件
| 预定义名 | 英文解释 | 中文解释 |
|---|
| ${workspaceFolder} | the path of the folder opened in VS Code | 根目录的绝对路径 |
| ${workspaceFolderBasename} | the name of the folder opened in VS Code without any slashes (/) | 根目录的名字 |
| ${file} | the current opened file | 文件的绝对路径 |
| ${relativeFile} | the current opened file relative to workspaceFolder | 相对于根目录,
文件的相对路径 |
| ${relativeFileDirname} | the current opened file’s dirname relative to workspaceFolder | 相对于根目录,
文件的目录名的相对路径 |
| ${fileBasename} | the current opened file’s basename | 文件的名称(有后缀) |
| ${fileBasenameNoExtension} | the current opened file’s basename with no file extension | 文件的名称(无 后缀 ) |
| ${fileDirname} | the current opened file’s dirname | 文件目录名的绝对路径 |
| ${fileExtname} | the current opened file’s extension | 文件的后缀名 |
| ${cwd} | the task runner’s current working directory on startup | vscode 启动时打开的目录 |
| ${lineNumber} | the current selected line number in the active file | 在激活的文件中选中的行号 |
| ${selectedText} | the current selected text in the active file | 在激活的文件中选中的文本 |
| ${execPath} | the path to the running VS Code executable | 运行 vscode 可执行代码的路径 |
| ${defaultBuildTask} | the name of the default build task | 默认生成任务的名称(这个不知咋用) |
如果看不懂这个解释,使用下面这个方法查看真实值是什么
6.2、查看${workspaceFolder}具体是什么值的方法。
在你的task.json中将按上图设置,在Terminal菜单中Run Task
6.3 vscode 自定义配色方案
VSCode自定义配色方案
6.4 vscode配置topper
参考了上面一篇文章。我也进行了我的配置,注释掉了一些,然后也改了下python的。

这一块就可以自动插入了。
放上我的topper配置代码,就复制到settings.json里面的第一层大括号里面就好了。
// 下面是topper的插入header配置
    "topper.customTemplateParameters": [
        {
            "personalProfile": {
                "author": "harry",
                // "website": "bulbasaur.github.bitbucket.yababbdadado.com",
                // "copyright": "None \n None",
                // "license": "None",
                "email": "619342297@qq.com",
                "description": "do somethings"
            }
        }
    ],
    "topper.headerTemplates": [
        {
            "defaultCStyled": {
                "headerBegin": "/**",
                "headerPrefix": "*",
                "headerEnd": "*/",
                "template": [
                    "${headerBegin}",
                    // "${headerPrefix} ${fileName}",
                    "${headerPrefix} author: ${author}",
                    "${headerPrefix} description: ${description}",
                    "${headerPrefix} created: ${createdDate}",
                    "${headerPrefix} copyright: ${copyright}",
                    "${headerPrefix} last-modified: ${lastModifiedDate}",
                    // "${headerEnd}"
                ]
            }
        },
        {
            "python": {
                "template": [
                    "# -*- coding: utf-8 -*-",
                    "'''",
                    "author: ${author}",
                    "description: ${description}",
                    "created: ${createdDate}",
                    "last-modified: ${lastModifiedDate}",
                    "'''"
                ]
            }
        }
    ],
设置yapf格式化工具
很多时候漏掉这一句:则yapf就无效了:
报错:python语言基础功能 无法格式化
cs