上一篇博客中,我们了解了什么是面部标志,以及如何使用dlib,OpenCV和Python检测它们。利用dlib的HOG SVM的形状预测器获得面部ROI中面部区域的68个点(x,y)坐标。
这一篇博客中,将演示如何使用NumPy数组切片魔术来分别访问每个面部部分并提取眼睛,眉毛,鼻子,嘴巴和下巴的特征。
1. 效果图
先上一张检测完的图:
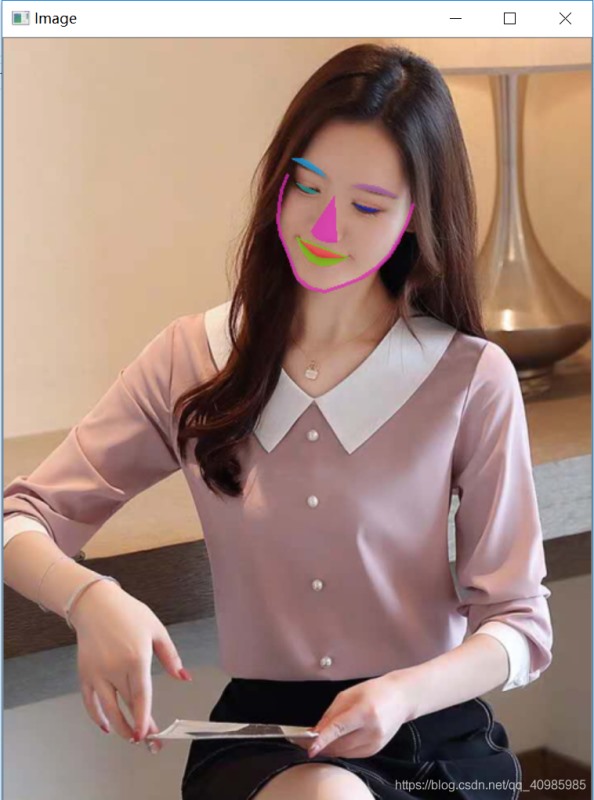
也可以每一部分先标识出来:

2. 原理
面部标志主要是: 口 右眉 左眉 右眼 左眼 鼻子 下颚线
这一节即提取这些部分;
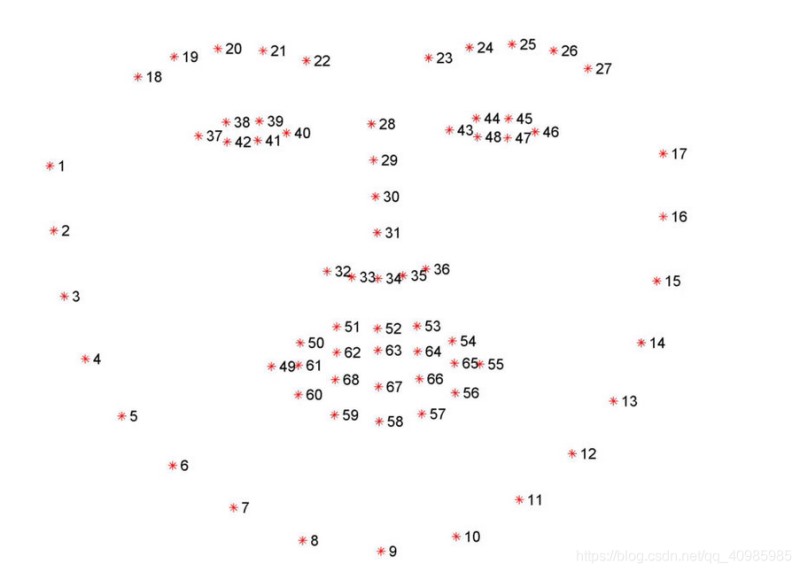
从图中可以看到假设是以0为下标的数组:
嘴唇可以认为是: points [48, 68]. 内嘴唇:[60,68]
右眉毛 points [17, 22].
左眉毛 points [22, 27].
右眼 [36, 42].
左眼 [42, 48].
鼻子 [27, 35].
下颌 [0, 17].
已经知道下标,数组切片,并用不同的颜色来标识各个部位,imutils包,可以帮助我们更优雅的写代码的包;已经有封装好方法face_utils 。
嘴唇等是闭合区域,用闭合的凸包表示,下颌用线勾勒;
面部标志检测返回结果是:68个(x,y)坐标:
(1)先转为适合OpenCV处理的 Numpy array,
(2)数组切片,用不同的颜色标识不同的面部结构部分;
3. 源码
# 安装了dlib
# imutils 是最新的版本
# python detect_face_parts.py --shape-predictor shape_predictor_68_face_landmarks.dat --image images/girl.jpg

from imutils import face_utils
import numpy as np
import argparse
import imutils
import dlib
import cv2
import shutil
import os

# 构建命令行参数
# --shape-predictor 必须 形状检测器位置
# --image 必须 待检测的图片
ap = argparse.ArgumentParser()
ap.add_argument("-p", "--shape-predictor", required=True,
                help="path to facial landmark predictor")
ap.add_argument("-i", "--image", required=True,
                help="path to input image")
args = vars(ap.parse_args())

temp_dir = "temp"
shutil.rmtree(temp_dir, ignore_errors=True)
os.makedirs(temp_dir)

# 初始化dlib中基于HOG的面部检测器,及形状预测器
detector = dlib.get_frontal_face_detector()
predictor = dlib.shape_predictor(args["shape_predictor"])

# 加载待检测的图片,resize,并且装换为灰度图
image = cv2.imread(args["image"])
image = imutils.resize(image, width=500)
gray = cv2.cvtColor(image, cv2.COLOR_BGR2GRAY)

# 在灰度图中检测面部
rects = detector(gray, 1)

# 循环检测到的面部
num = 0
for (i, rect) in enumerate(rects):
    # 确定面部区域进行面部标志检测,并将其检测到的68个点转换为方便python处理的Numpy array
    shape = predictor(gray, rect)
    shape = face_utils.shape_to_np(shape)

    # 循环遍历面部标志独立的每一部分
    for (name, (i, j)) in face_utils.FACIAL_LANDMARKS_IDXS.items():

        # 复制一张原始图的拷贝,以便于绘制面部区域,及其名称
        clone = image.copy()
        cv2.putText(clone, name, (10, 30), cv2.FONT_HERSHEY_SIMPLEX,
                    0.7, (0, 0, 255), 2)

        # 遍历独立的面部标志的每一部分包含的点,并画在图中
        for (x, y) in shape[i:j]:
            cv2.circle(clone, (x, y), 1, (0, 0, 255), -1)
            # 要实际提取每个面部区域,我们只需要计算与特定区域关联的(x,y)坐标的边界框,并使用NumPy数组切片来提取它:
            (x, y, w, h) = cv2.boundingRect(np.array([shape[i:j]]))
            roi = image[y:y + h, x:x + w]

            # resize ROI区域为 宽度250,以便于更好的可视化
            roi = imutils.resize(roi, width=250, inter=cv2.INTER_CUBIC)

            # 展示独立的面部标志
            cv2.imshow("ROI", roi)
            cv2.imshow("Image", clone)
            cv2.waitKey(0)

        num = num + 1
        p = os.path.sep.join([temp_dir, "{}.jpg".format(
            str(num).zfill(8))])
        print('p: ', p)
        cv2.imwrite(p, output)

    # 应用visualize_facial_landmarks 功能为每个面部部位创建透明的覆盖层。(transparent overlay)
    output = face_utils.visualize_facial_landmarks(image, shape)
    cv2.imshow("Image", output)
    cv2.waitKey(0)
参考
https://www.pyimagesearch.com/2017/04/10/detect-eyes-nose-lips-jaw-dlib-opencv-python/
jsjbwy