这篇博客将介绍如何使用OpenCV和深度学习应用全面嵌套的边缘检测。并将对图像和视频流应用全面嵌套边缘检测,然后将结果与OpenCV的标准Canny边缘检测器进行比较。
1. 效果图
愤怒的小鸟——原始图 VS Canny边缘检测图 VS HED边缘检测图

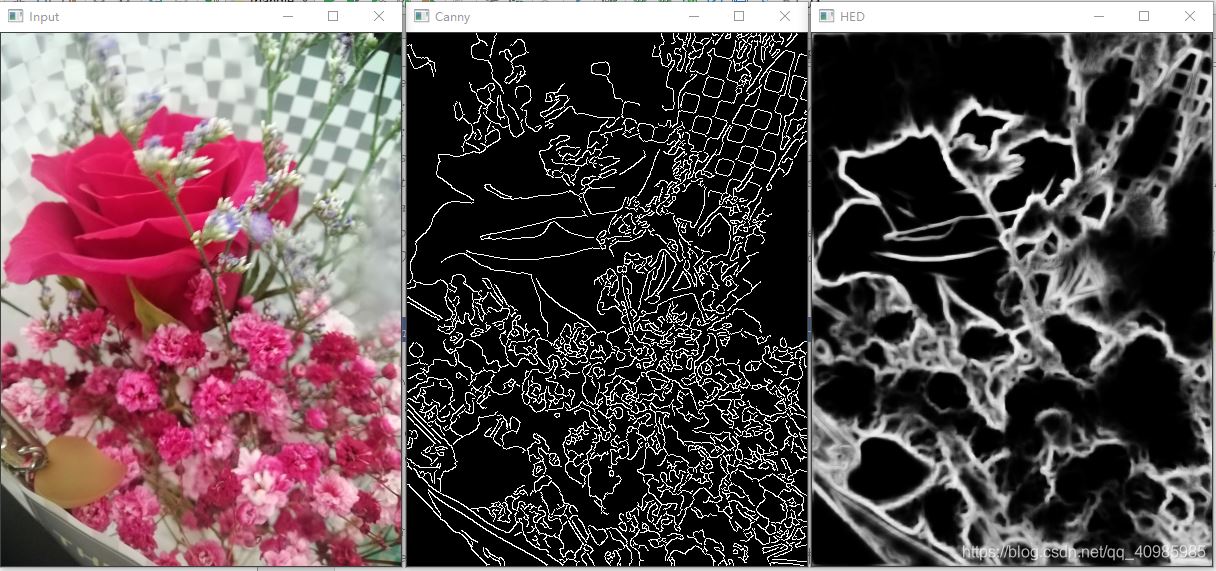
花朵——原始图 VS Canny边缘检测图 VS HED边缘检测图
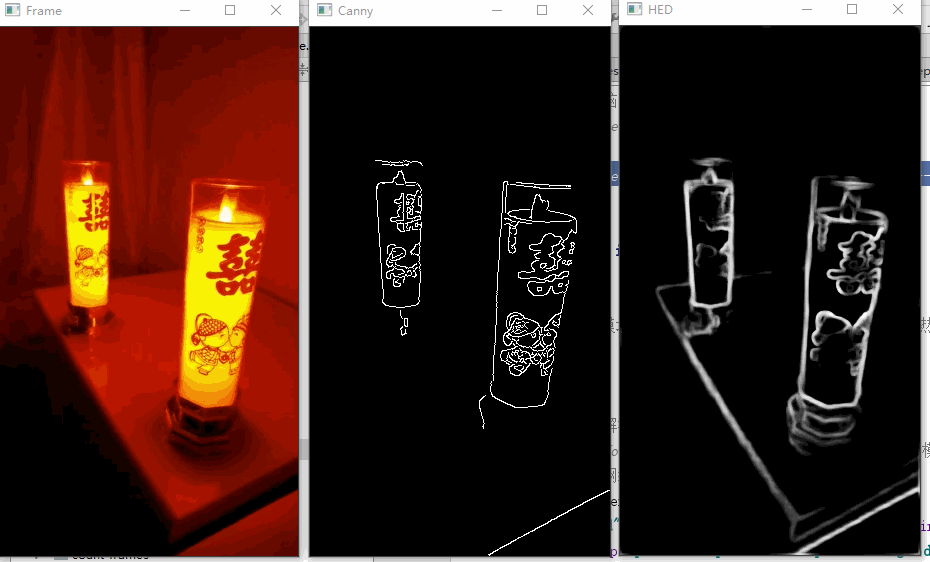
视频效果图GIF 如下
2. 全面嵌套边缘检测与Canny边缘检测
2.1 Hed与Canny边缘检测对比
Holistically-Nested Edge Detection (HED) 全面嵌套边缘检测
Canny Edge Detection Canny边缘检测
OpenCV 利用Canny边缘检测能够找到图像中对象的边界。但是Canny边缘检测器存在一些问题,即:
- 需要手动验证(将下部和上值设置为滞后阈值,是一种需要实验和视觉验证的手动过程);
- 不具备通用性(对不同照明条件下捕获的相同图像,适用于一个图像,却不适用于另一个图像);
- 通常需要许多预处理步骤(即转换为灰度,模糊/平滑等),以获得良好的边缘图。
整体嵌套边缘检测(HED)试图通过端到端深神经网络解决Canny边缘检测器的局限性。
该网络接受RGB图像作为输入,然后将边缘图作为输出产生。而且通过HED产生的边缘图在图像中很好的保留了对象边界。
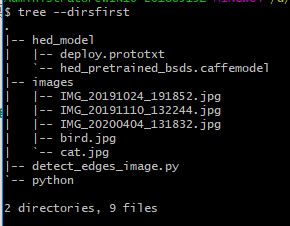
2.2. 项目结构
2.3 deploy.prototxt, hed_pretrained_bsds.caffemodel下载
执行代码的关键是获取deploy.prototxt, hed_pretrained_bsds.caffemodel
https://github.com/opencv/opencv/blob/master/samples/dnn/edge_detection.py
https://github.com/seminar2012/hed
- This sample shows how to define custom OpenCV deep learning layers in Python.
- Holistically-Nested Edge Detection (https://arxiv.org/abs/1504.06375) neural network is used as an example model.
- Find a pre-trained model at https://github.com/s9xie/hed. We provide the pretrained model and training/testing code for the edge detection framework Holistically-Nested Edge Detection (HED).
- Please see the Arxiv or ICCV paper for technical details. The pretrained model (fusion-output) gives ODS=.790 and OIS=.808 result on BSDS benchmark dataset.
- Download the pretrained model (56MB) from (http://vcl.ucsd.edu/hed/hed_pretrained_bsds.caffemodel) and place it in examples/hed/ folder.
3. 源码
3.1 对图像进行HED检测
# USAGE
# python detect_edges_image.py --edge-detector hed_model --image images/bird.jpg

# 导入必要的包
import argparse
import cv2
import os
import imutils

# 构建命令行参数及解析
# --edge-detector Holistically-Nested Edge Detection检测器模型路径
# --image 图片路径
ap = argparse.ArgumentParser()
ap.add_argument("-d", "--edge-detector", type=str, required=True,
                help="path to OpenCV's deep learning edge detector")
ap.add_argument("-i", "--image", type=str, required=True,
                help="path to input image")
args = vars(ap.parse_args())


class CropLayer(object):
    def __init__(self, params, blobs):
        # 初始化剪切区域开始和结束点的坐标
        self.xstart = 0
        self.ystart = 0
        self.xend = 0
        self.yend = 0

    # 计算输入图像的体积
    def getMemoryShapes(self, inputs):
        # 剪切类将接收俩个参数
        # 剪切第一个输入blob以匹配第二个blob,保持批次和通道数
        # 输出输入容积的形状及目标形状
        # 提取批量大小及通道数
        # 分别提取目标形状的高和宽
        (inputShape, targetShape) = (inputs[0], inputs[1])
        (batchSize, numChannels) = (inputShape[0], inputShape[1])
        (H, W) = (targetShape[2], targetShape[3])

        # 计算开始和结束剪切坐标的值
        self.xstart = int((inputShape[3] - targetShape[3]) // 2)
        self.ystart = int((inputShape[2] - targetShape[2]) // 2)
        self.xend = self.xstart + W
        self.yend = self.ystart + H

        # 返回体积,接下来进行实际裁剪
        return [[batchSize, numChannels, H, W]]

    def forward(self, inputs):
        return [inputs[0][:, :, self.ystart:self.yend, self.xstart:self.xend]]


# 从磁盘加载序列化的边缘检测器模型
print("[INFO] loading edge detector...")
protoPath = os.path.sep.join([args["edge_detector"],
                              "deploy.prototxt"])
modelPath = os.path.sep.join([args["edge_detector"],
                              "hed_pretrained_bsds.caffemodel"])
net = cv2.dnn.readNetFromCaffe(protoPath, modelPath)

# 绑定剪裁类到模型
cv2.dnn_registerLayer("Crop", CropLayer)

# 加载输入图像,获取其维度
image = cv2.imread(args["image"])
image = imutils.resize(image, width=400)
(H, W) = image.shape[:2]

# 转换图像为灰度图,高斯平滑,执行Canny边缘检测
print("[INFO] performing Canny edge detection...")
gray = cv2.cvtColor(image, cv2.COLOR_BGR2GRAY)
blurred = cv2.GaussianBlur(gray, (5, 5), 0)
canny = cv2.Canny(blurred, 30, 150)

# 根据输入图像为全面的嵌套边缘检测器(Holistically-Nested Edge Detector)构建一个输出blob
blob = cv2.dnn.blobFromImage(image, scalefactor=1.0, size=(W, H),
                             mean=(104.00698793, 116.66876762, 122.67891434),
                             swapRB=False, crop=False)

# # 设置blob作为网络的输入并执行算法以计算边缘图
print("[INFO] performing holistically-nested edge detection...")
net.setInput(blob)
hed = net.forward()
# 调整输出为原始图像尺寸的大小
hed = cv2.resize(hed[0, 0], (W, H))
# 将图像像素缩回到范围[0,255]并确保类型为“UINT8”
hed = (255 * hed).astype("uint8")

# 展示HED边缘检测的结果及Canny边缘检测的结果
cv2.imshow("Input", image)
cv2.imshow("Canny", canny)
cv2.imshow("HED", hed)
cv2.waitKey(0)
3.2 对视频进行HED检测
# USAGE 默认使用电脑自带的摄像头
# python detect_edges_video.py --edge-detector hed_model
# 使用视频文件流
# python detect_edges_video.py --edge-detector hed_model --input xl.mp4

# 导入必要的包
from imutils.video import VideoStream
import argparse
import imutils
import time  # 此模块允许放置睡眠命令以允许视频流建立和“热身”。
import cv2
import os

# 构建命令行参数及解析
# --edge-detector Holistically-Nested Edge Detection检测器模型路径
# --input 视频源:网络摄像头,视频文件或其他源。
ap = argparse.ArgumentParser()
ap.add_argument("-d", "--edge-detector", type=str, required=True,
                help="path to OpenCV's deep learning edge detector")
ap.add_argument("-i", "--input", type=str,
                help="path to optional input video (webcam will be used otherwise)")
args = vars(ap.parse_args())


class CropLayer(object):
    def __init__(self, params, blobs):
        # 初始化剪切区域开始和结束点的坐标
        self.xstart = 0
        self.ystart = 0
        self.xend = 0
        self.yend = 0

    # 计算输入图像的体积
    def getMemoryShapes(self, inputs):
        # 剪切类将接收俩个参数
        # 剪切第一个输入blob以匹配第二个blob,保持批次和通道数
        # 输出输入容积的形状及目标形状
        # 提取批量大小及通道数
        # 分别提取目标形状的高和宽
        (inputShape, targetShape) = (inputs[0], inputs[1])
        (batchSize, numChannels) = (inputShape[0], inputShape[1])
        (H, W) = (targetShape[2], targetShape[3])

        # 计算开始和结束剪切坐标的值
        self.xstart = int((inputShape[3] - targetShape[3]) // 2)
        self.ystart = int((inputShape[2] - targetShape[2]) // 2)
        self.xend = self.xstart + W
        self.yend = self.ystart + H

        # 返回体积,接下来进行实际裁剪
        return [[batchSize, numChannels, H, W]]

    def forward(self, inputs):
        # 使用派生(x,y)-oordinate来执行裁剪
        return [inputs[0][:, :, self.ystart:self.yend, self.xstart:self.xend]]


# 初始化视频流,脚本将动态选取使用视频文件流还是网络摄像头流
webcam = not args.get("input", False)

# 如果未提供视频文件路径,则使用电脑自带摄像头
if webcam:
    print("[INFO] starting video stream...")
    vs = VideoStream(src=0).start()
    time.sleep(2.0)
# 否则,获取视频文件流指针
else:
    print("[INFO] opening video file...")
    vs = cv2.VideoCapture(args["input"])

# 从磁盘加载序列化的HED检测器模型
print("[INFO] loading edge detector...")
protoPath = os.path.sep.join([args["edge_detector"],
                              "deploy.prototxt"])
modelPath = os.path.sep.join([args["edge_detector"],
                              "hed_pretrained_bsds.caffemodel"])
net = cv2.dnn.readNetFromCaffe(protoPath, modelPath)

# 将剪裁类注册到模型
cv2.dnn_registerLayer("Crop", CropLayer)

# 遍历视频流的帧
while True:
    # 获取每一帧,如果使用网络摄像头,获取下一帧
    frame = vs.read()
    frame = frame if webcam else frame[1]

    # 如果在处理视频文件流,没有获取到帧则代表已经到了文件尾部,则跳出循环
    if not webcam and frame is None:
        break

    # 等比例缩放帧为宽度500,并获取其维度
    frame = imutils.resize(frame, width=300)
    (H, W) = frame.shape[:2]

    # 转换灰度图,高斯模糊并执行Canny边缘检测
    gray = cv2.cvtColor(frame, cv2.COLOR_BGR2GRAY)
    blurred = cv2.GaussianBlur(gray, (5, 5), 0)
    canny = cv2.Canny(blurred, 30, 150)

    # 为HED边缘检测器构建输入帧的blob,设置blob,并执行检测以计算边缘图
    blob = cv2.dnn.blobFromImage(frame, scalefactor=1.0, size=(W, H),
                                 mean=(104.00698793, 116.66876762, 122.67891434),
                                 swapRB=False, crop=False)
    net.setInput(blob)
    hed = net.forward()
    hed = cv2.resize(hed[0, 0], (W, H))
    hed = (255 * hed).astype("uint8")

    # 展示Canny、HED的检测结果
    cv2.imshow("Frame", frame)
    cv2.imshow("Canny", canny)
    cv2.imshow("HED", hed)
    key = cv2.waitKey(1) & 0xFF
    # 按下‘q'键表示退出循环
    if key == ord("q"):
        break

# 如果在使用网络摄像头流,则终止相机视频流
if webcam:
    vs.stop()
# 否则,释放视频文件流指针
else:
    vs.release()

# 关闭所有打开的window
cv2.destroyAllWindows()
参考
https://www.pyimagesearch.com/2019/03/04/holistically-nested-edge-detection-with-opencv-and-deep-learning/
js