#include <stdio.h>
#include <Windows.h>
int WINAPI WinMain (
_In_ HINSTANCE hInstance,
_In_opt_ HINSTANCE hPrevInstance,
_In_ LPSTR lpCmdLine,
_In_ int nShowCmd
) {
SetProcessDPIAware();
auto className = L"MyWindow";
WNDCLASSW wndClass = {};
wndClass.hInstance = NULL;
wndClass.lpszClassName = className;
wndClass.lpfnWndProc = [](HWND hwnd, UINT msg, WPARAM wParam, LPARAM lParam) -> LRESULT {
return DefWindowProc(hwnd, msg, wParam, lParam);
};
RegisterClass(&wndClass);
auto window = CreateWindow(className, L"Hello World 标题", WS_OVERLAPPEDWINDOW, CW_USEDEFAULT, CW_USEDEFAULT, 800, 600, NULL, NULL, NULL, NULL);
ShowWindow(window, SW_SHOW);

MSG msg;
while (GetMessage(&msg, window, 0, 0) > 0) {
	TranslateMessage(&msg);
	DispatchMessage(&msg);
}
return 0;
}
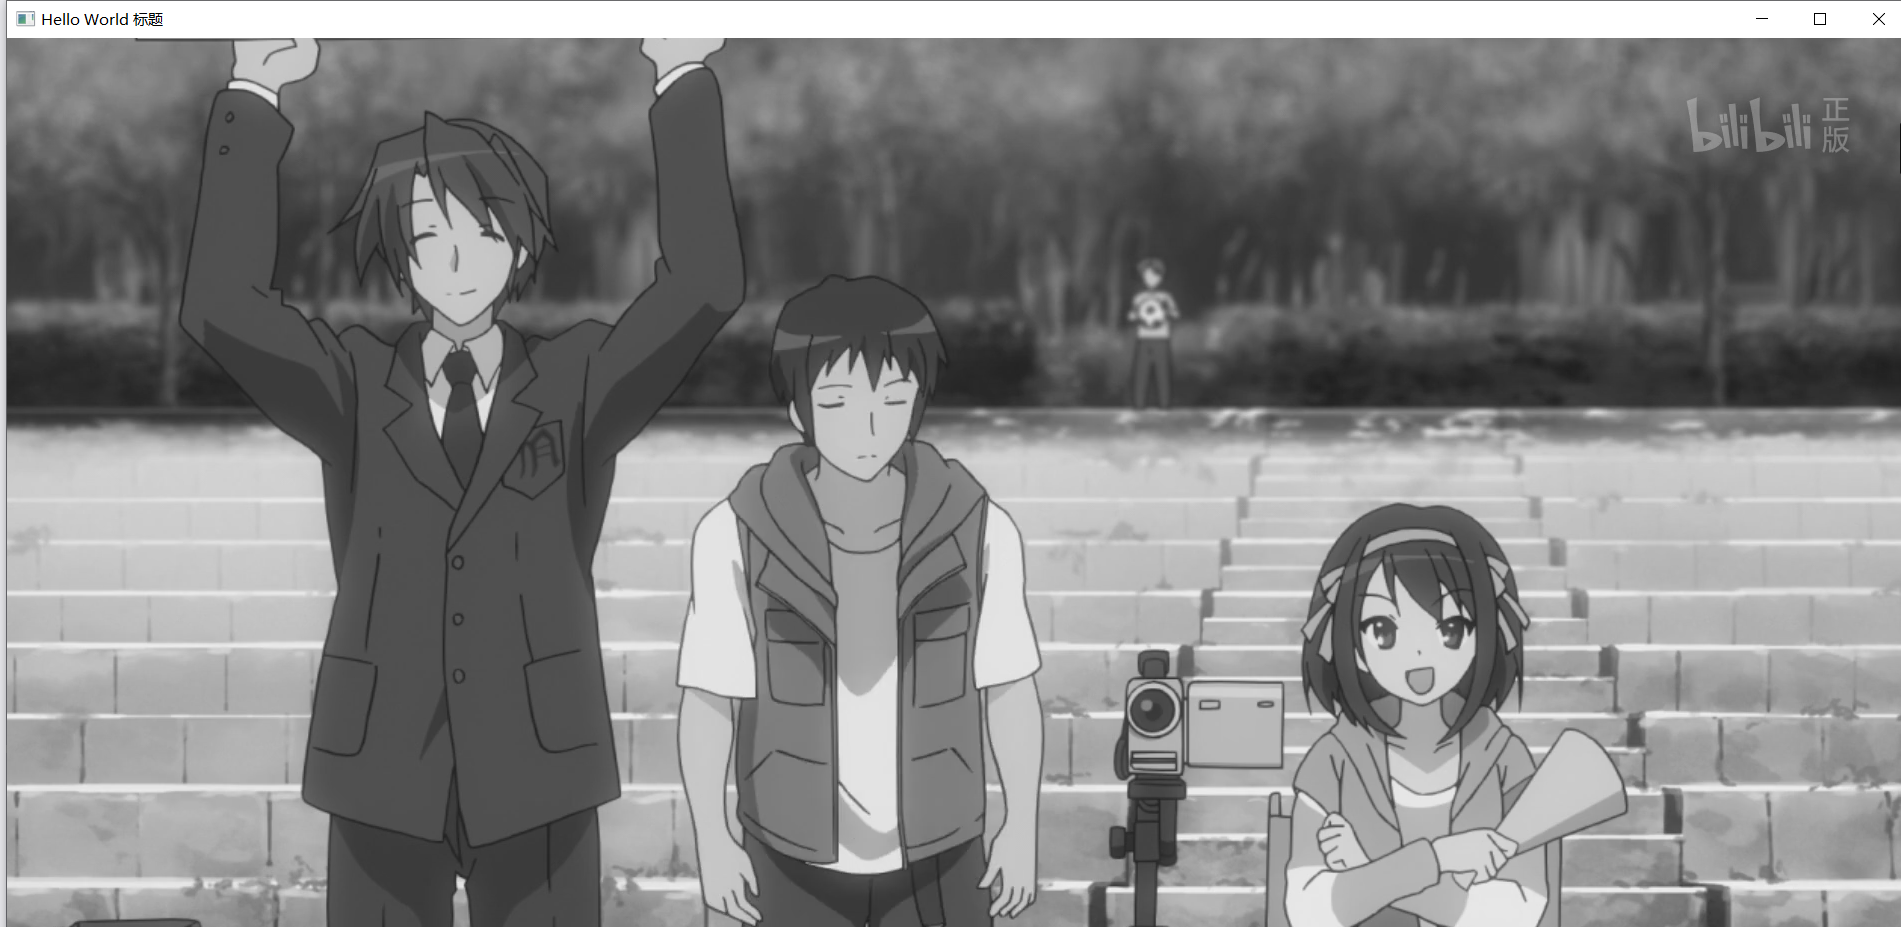
效果:
引入FFmpeg
我们就不费心从源码编译了,直接下载编译好的文件就行:https://github.com/BtbN/FFmpeg-Builds/releases,注意下载带shared的版本,例如:ffmpeg-N-102192-gc7c138e411-win64-gpl-shared.zip,解压后有三个文件夹,分别是 bin, include, lib,这分别对应了三个需要配置的东西。
接下来建立两个环境变量,注意目录改为你的实际解压目录:
- FFMPEG_INCLUDE = D:\Download\ffmpeg-N-102192-gc7c138e411-win64-gpl-shared\include
- FFMPEG_LIB = D:\Download\ffmpeg-N-102192-gc7c138e411-win64-gpl-shared\lib
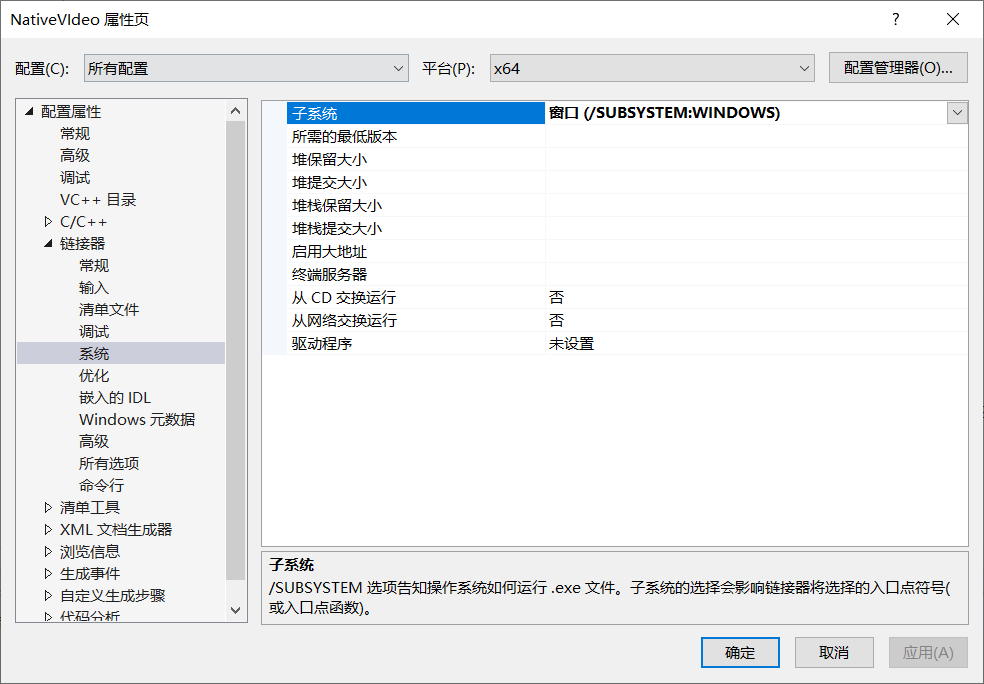
注意每次修改环境变量,都需要重启Visual Studio。然后配置 VC++目录 中的包含目录和库目录

然后就可以在代码中引入FFmpeg的头文件,并且正常编译了:
extern "C" {
#include <libavcodec/avcodec.h>
#pragma comment(lib, "avcodec.lib")

#include <libavformat/avformat.h>
#pragma comment(lib, "avformat.lib")

#include <libavutil/imgutils.h>
#pragma comment(lib, "avutil.lib")

}
最后还要在环境变量PATH加入路径 D:\Download\ffmpeg-N-102192-gc7c138e411-win64-gpl-shared\bin,以便让程序运行时正确载入FFmpeg的dll。
解码第一帧画面
接下来我们编写一个函数,获取到第一帧的像素集合。
AVFrame* getFirstFrame(const char* filePath) {
	AVFormatContext* fmtCtx = nullptr;
	avformat_open_input(&fmtCtx, filePath, NULL, NULL);
	avformat_find_stream_info(fmtCtx, NULL);

	int videoStreamIndex;
	AVCodecContext* vcodecCtx = nullptr;
	for (int i = 0; i < fmtCtx->nb_streams; i++) {
		AVStream* stream = fmtCtx->streams[i];
		if (stream->codecpar->codec_type == AVMEDIA_TYPE_VIDEO) {
			const AVCodec* codec = avcodec_find_decoder(stream->codecpar->codec_id);
			videoStreamIndex = i;
			vcodecCtx = avcodec_alloc_context3(codec);
			avcodec_parameters_to_context(vcodecCtx, fmtCtx->streams[i]->codecpar);
			avcodec_open2(vcodecCtx, codec, NULL);
		}
	}

	while (1) {
		AVPacket* packet = av_packet_alloc();
		int ret = av_read_frame(fmtCtx, packet);
		if (ret == 0 && packet->stream_index == videoStreamIndex) {
			ret = avcodec_send_packet(vcodecCtx, packet);
			if (ret == 0) {
				AVFrame* frame = av_frame_alloc();
				ret = avcodec_receive_frame(vcodecCtx, frame);
				if (ret == 0) {
					av_packet_unref(packet);
					avcodec_free_context(&vcodecCtx);
					avformat_close_input(&fmtCtx);
					return frame;
				}
				else if (ret == AVERROR(EAGAIN)) {
					av_frame_unref(frame);
					continue;
				}
			}
		}

		av_packet_unref(packet);
	}
}
流程简单来说,就是:
- 获取
AVFormatContext,这个代表这个视频文件的容器
- 获取
AVStream,一个视频文件会有多个流,视频流、音频流等等其他资源,我们目前只关注视频流,所以这里有一个判断 stream->codecpar->codec_type == AVMEDIA_TYPE_VIDEO
- 获取
AVCodec,代表某个流对应的解码器
- 获取
AVCodecContext,代表解码器的解码上下文环境
- 进入解码循环,调用用
av_read_frame 获取 AVPacket,判断是否是视频流的数据包,是则调用 avcodec_send_packet 发送给 AVCodecContext 进行解码,有时一个数据包是不足以解码出完整的一帧画面的,此时就要获取下一个数据包,再次调用 avcodec_send_packet 发送到解码器,尝试是否解码成功。
- 最后通过
avcodec_receive_frame 得到的 AVFrame 里面就包含了原始画面信息
很多视频画面第一帧都是全黑的,不方便测试,所以可以稍微改改代码,多读取后面的几帧。
AVFrame* getFirstFrame(const char* filePath, int frameIndex) {
// ...
	n++;
	if (n == frameIndex) {
		av_packet_unref(packet);
		avcodec_free_context(&vcodecCtx);
		avformat_close_input(&fmtCtx);
		return frame;
	}
	else {
		av_frame_unref(frame);
	}
// ...
}
可以直接通过AVFrame读取到画面的width, height
AVFrame* firstframe = getFirstFrame(filePath.c_str(), 10);

int width = firstframe->width;
int height = firstframe->height;
咱们关注的原始画面像素信息在 AVFrame::data 中,他的具体结构,取决于 AVFrame::format,这是视频所使用的像素格式,目前大多数视频都是用的YUV420P(AVPixelFormat::AV_PIX_FMT_YUV420P),为了方便,我们就只考虑它的处理。
渲染第一帧画面
与我们设想的不同,大多数视频所采用的像素格式并不是RGB,而是YUV,Y代表亮度,UV代表色度、浓度。最关键是的它有不同的采样方式,最常见的YUV420P,每一个像素,都单独存储1字节的Y值,每4个像素,共用1个U和1个V值,所以,一幅1920x1080的图像,仅占用 1920 * 1080 * (1 + (1 + 1) / 4) = 3110400 字节,是RGB编码的一半。这里利用了人眼对亮度敏感,但对颜色相对不敏感的特性,即使降低了色度带宽,感官上也不会过于失真。
但Windows没法直接渲染YUV的数据,因此需要转换。这里为了尽快看到画面,我们先只使用Y值来显示出黑白画面,具体做法如下:
struct Color_RGB
{
	uint8_t r;
	uint8_t g;
	uint8_t b;
};

AVFrame* firstframe = getFirstFrame(filePath.c_str(), 30);

int width = firstframe->width;
int height = firstframe->height;

vector<Color_RGB> pixels(width * height);
for (int i = 0; i < pixels.size(); i++) {
	uint8_t r = firstframe->data[0][i];
	uint8_t g = r;
	uint8_t b = r;
	pixels[i] = { r, g, b };
}
YUV420P格式会把Y、U、V三个值分开存储到三个数组,AVFrame::data[0] 就是Y通道数组,我们简单的把亮度值同时放进RGB就可以实现黑白画面了。接下来写一个函数对处理出来的RGB数组进行渲染,我们这里先使用最传统的GDI绘图方式:
void StretchBits (HWND hwnd, const vector<Color_RGB>& bits, int width, int height) {
	auto hdc = GetDC(hwnd);
	for (int x = 0; x < width; x++) {
		for (int y = 0; y < height; y++) {
			auto& pixel = bits[x + y * width];
			SetPixel(hdc, x, y, RGB(pixel.r, pixel.g, pixel.b));
		}
	}
	ReleaseDC(hwnd, hdc);
}
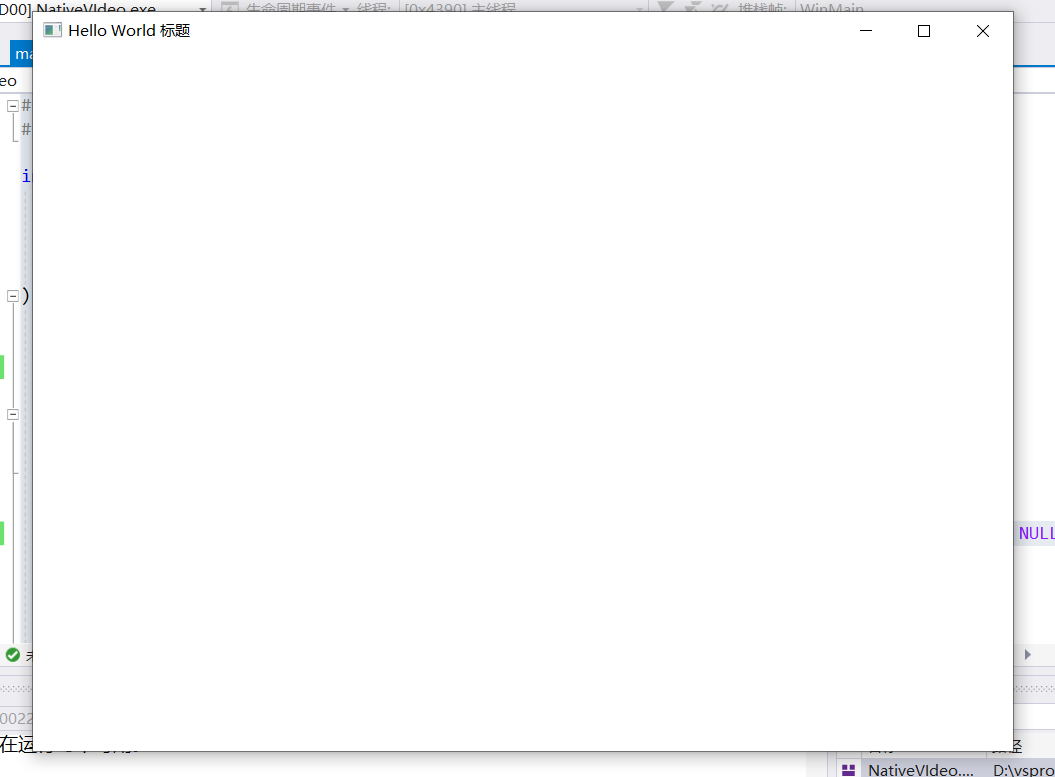
在 ShowWindow 调用之后,调用上面写的 StretchBits 函数,就会看到画面逐渐出现在窗口中了:
//...
ShowWindow(window, SW_SHOW);

StretchBits(window, pixels, width, height);

MSG msg;
while (GetMessage(&msg, window, 0, 0) > 0) {
	TranslateMessage(&msg);
	DispatchMessage(&msg);
}
// ...
一个显而易见的问题,就是渲染效率太低了,显示一帧就花了好几秒,对于普通每秒24帧的视频来说这完全不能接受,所以我们接下来尝试逐渐优化 StretchBits 函数。
优化GDI渲染
SetPixel 函数很显然效率太低了,一个更好的方案是使用 StretchDIBits 函数,但是他用起来没有那么简单直接。
void StretchBits (HWND hwnd, const vector<Color_RGB>& bits, int width, int height) {
	auto hdc = GetDC(hwnd);
	BITMAPINFO bitinfo = {};
	auto& bmiHeader = bitinfo.bmiHeader;
	bmiHeader.biSize = sizeof(bitinfo.bmiHeader);
	bmiHeader.biWidth = width;
	bmiHeader.biHeight = -height;
	bmiHeader.biPlanes = 1;
	bmiHeader.biBitCount = 24;
	bmiHeader.biCompression = BI_RGB;

	StretchDIBits(hdc, 0, 0, width, height, 0, 0, width, height, &bits[0], &bitinfo, DIB_RGB_COLORS, SRCCOPY);
	ReleaseDC(hwnd, hdc);
}
注意 bmiHeader.biHeight = -height; 这里必须要使用加一个负号,否则画面会发生上下倒转,在 BITMAPINFOHEADER structure 里有详细说明。这时我们渲染一帧画面的时间就缩短到了几毫秒了。
播放连续的画面
首先我们要拆解 getFirstFrame 函数,把循环解码的部分单独抽出来,分解为两个函数:InitDecoder 和 RequestFrame
struct DecoderParam
{
	AVFormatContext* fmtCtx;
	AVCodecContext* vcodecCtx;
	int width;
	int height;
	int videoStreamIndex;
};

void InitDecoder(const char* filePath, DecoderParam& param) {
	AVFormatContext* fmtCtx = nullptr;
	avformat_open_input(&fmtCtx, filePath, NULL, NULL);
	avformat_find_stream_info(fmtCtx, NULL);

	AVCodecContext* vcodecCtx = nullptr;
	for (int i = 0; i < fmtCtx->nb_streams; i++) {
		const AVCodec* codec = avcodec_find_decoder(fmtCtx->streams[i]->codecpar->codec_id);
		if (codec->type == AVMEDIA_TYPE_VIDEO) {
			param.videoStreamIndex = i;
			vcodecCtx = avcodec_alloc_context3(codec);
			avcodec_parameters_to_context(vcodecCtx, fmtCtx->streams[i]->codecpar);
			avcodec_open2(vcodecCtx, codec, NULL);
		}
	}

	param.fmtCtx = fmtCtx;
	param.vcodecCtx = vcodecCtx;
	param.width = vcodecCtx->width;
	param.height = vcodecCtx->height;
}

AVFrame* RequestFrame(DecoderParam& param) {
	auto& fmtCtx = param.fmtCtx;
	auto& vcodecCtx = param.vcodecCtx;
	auto& videoStreamIndex = param.videoStreamIndex;

	while (1) {
		AVPacket* packet = av_packet_alloc();
		int ret = av_read_frame(fmtCtx, packet);
		if (ret == 0 && packet->stream_index == videoStreamIndex) {
			ret = avcodec_send_packet(vcodecCtx, packet);
			if (ret == 0) {
				AVFrame* frame = av_frame_alloc();
				ret = avcodec_receive_frame(vcodecCtx, frame);
				if (ret == 0) {
					av_packet_unref(packet);
					return frame;
				}
				else if (ret == AVERROR(EAGAIN)) {
					av_frame_unref(frame);
				}
			}
		}

		av_packet_unref(packet);
	}

	return nullptr;
}
然后在 main 函数中这样写:
// ...
DecoderParam decoderParam;
InitDecoder(filePath.c_str(), decoderParam);
auto& width = decoderParam.width;
auto& height = decoderParam.height;
auto& fmtCtx = decoderParam.fmtCtx;
auto& vcodecCtx = decoderParam.vcodecCtx;

auto window = CreateWindow(className, L"Hello World 标题", WS_OVERLAPPEDWINDOW, 0, 0, decoderParam.width, decoderParam.height, NULL, NULL, hInstance, NULL);

ShowWindow(window, SW_SHOW);

MSG msg;
while (GetMessage(&msg, window, 0, 0) > 0) {
	AVFrame* frame = RequestFrame(decoderParam);

	vector<Color_RGB> pixels(width * height);
	for (int i = 0; i < pixels.size(); i++) {
		uint8_t r = frame->data[0][i];
		uint8_t g = r;
		uint8_t b = r;
		pixels[i] = { r, g, b };
	}

	av_frame_free(&frame);

	StretchBits(window, pixels, width, height);

	TranslateMessage(&msg);
	DispatchMessage(&msg);
}
// ...
此时运行程序,发现画面还是不动,只有当我们的鼠标在窗口不断移动时,画面才会连续播放。这是因为我们使用了 GetMessage,当窗口没有任何消息时,该函数会一直阻塞,直到有新的消息才会返回。当我们用鼠标在窗口上不断移动其实就相当于不断向窗口发送鼠标事件消息,才得以让while循环不断执行。
解决办法就是用 PeekMessage 代替,该函数不管有没有接收到消息,都会返回。我们稍微改改消息循环代码:
// ...
wndClass.lpfnWndProc = [](HWND hwnd, UINT msg, WPARAM wParam, LPARAM lParam) -> LRESULT {
	switch (msg)
	{
	case WM_DESTROY:
		PostQuitMessage(0);
		return 0;
	default:
		return DefWindowProc(hwnd, msg, wParam, lParam);
	}
};
// ...
while (1) {
	BOOL hasMsg = PeekMessage(&msg, NULL, 0, 0, PM_REMOVE);
	if (hasMsg) {
		if (msg.message == WM_QUIT) {
			break;
		}
		TranslateMessage(&msg);
		DispatchMessage(&msg);
	}
	else {
		AVFrame* frame = RequestFrame(decoderParam);

		vector<Color_RGB> pixels(width * height);
		for (int i = 0; i < pixels.size(); i++) {
			uint8_t r = frame->data[0][i];
			uint8_t g = r;
			uint8_t b = r;
			pixels[i] = { r, g, b };
		}

		av_frame_free(&frame);

		StretchBits(window, pixels, width, height);
	}
}
注意改用了 PeekMessage 后需要手动处理一下 WM_DESTROY 和 WM_QUIT 消息。此时即使鼠标不移动画面也能连续播放了。但在我笔记本 i5-1035G1 那孱弱性能下,画面效果比PPT还惨,此时只要把VS的生成配置从 Debug 改为 Release,画面直接就像按了快进键一样,这代码优化开与不开有时候真是天差地别。
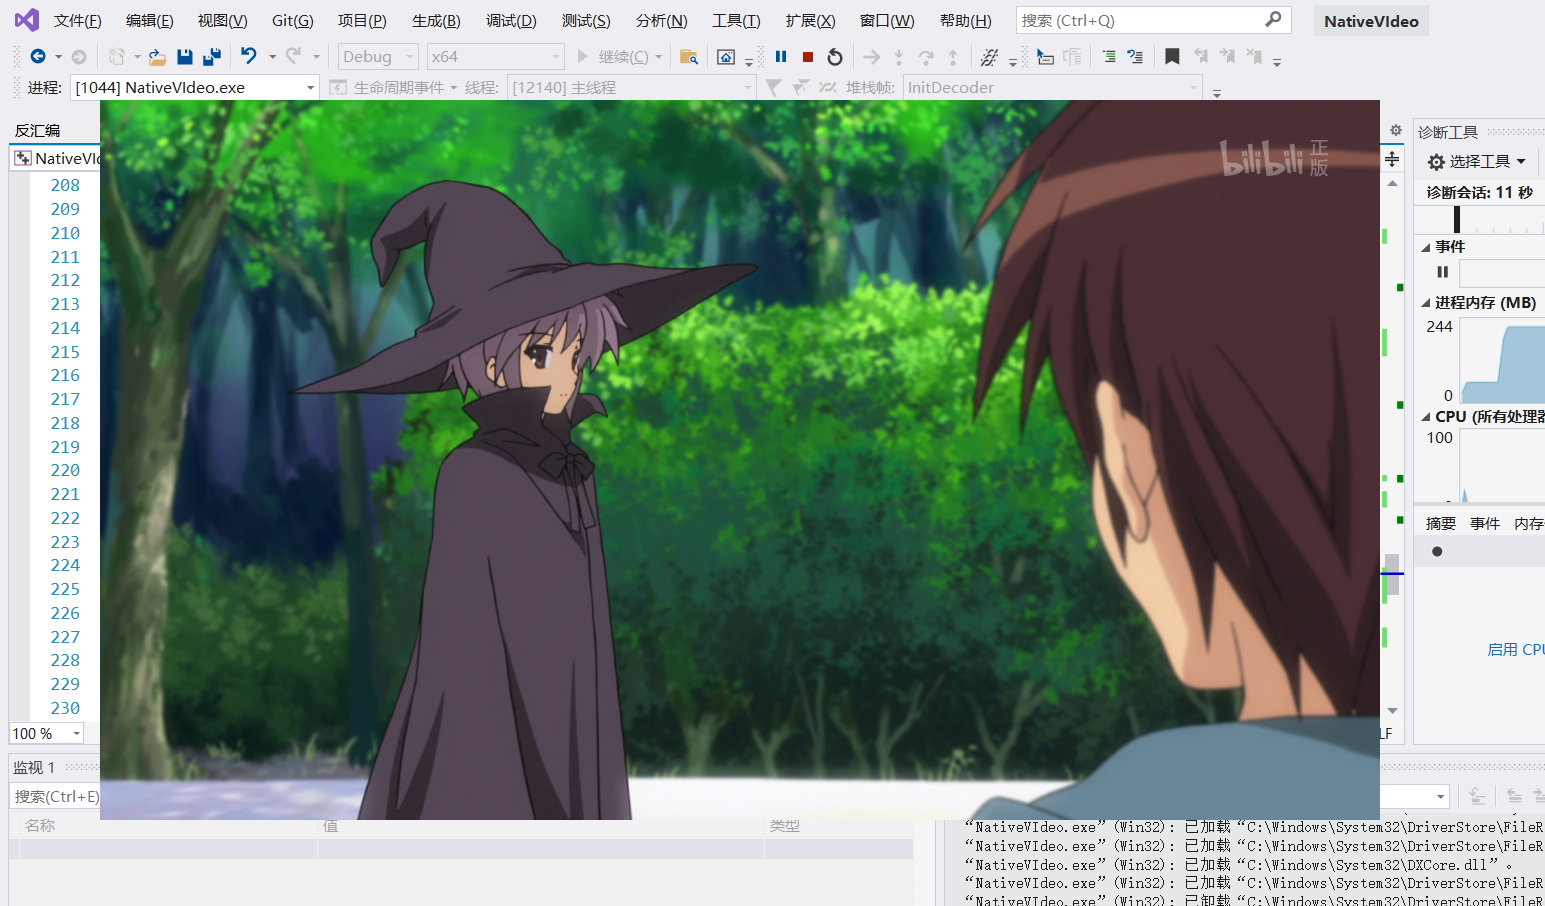
这里插播一下 Visual Studio 的性能诊断工具,实在是太强大了。
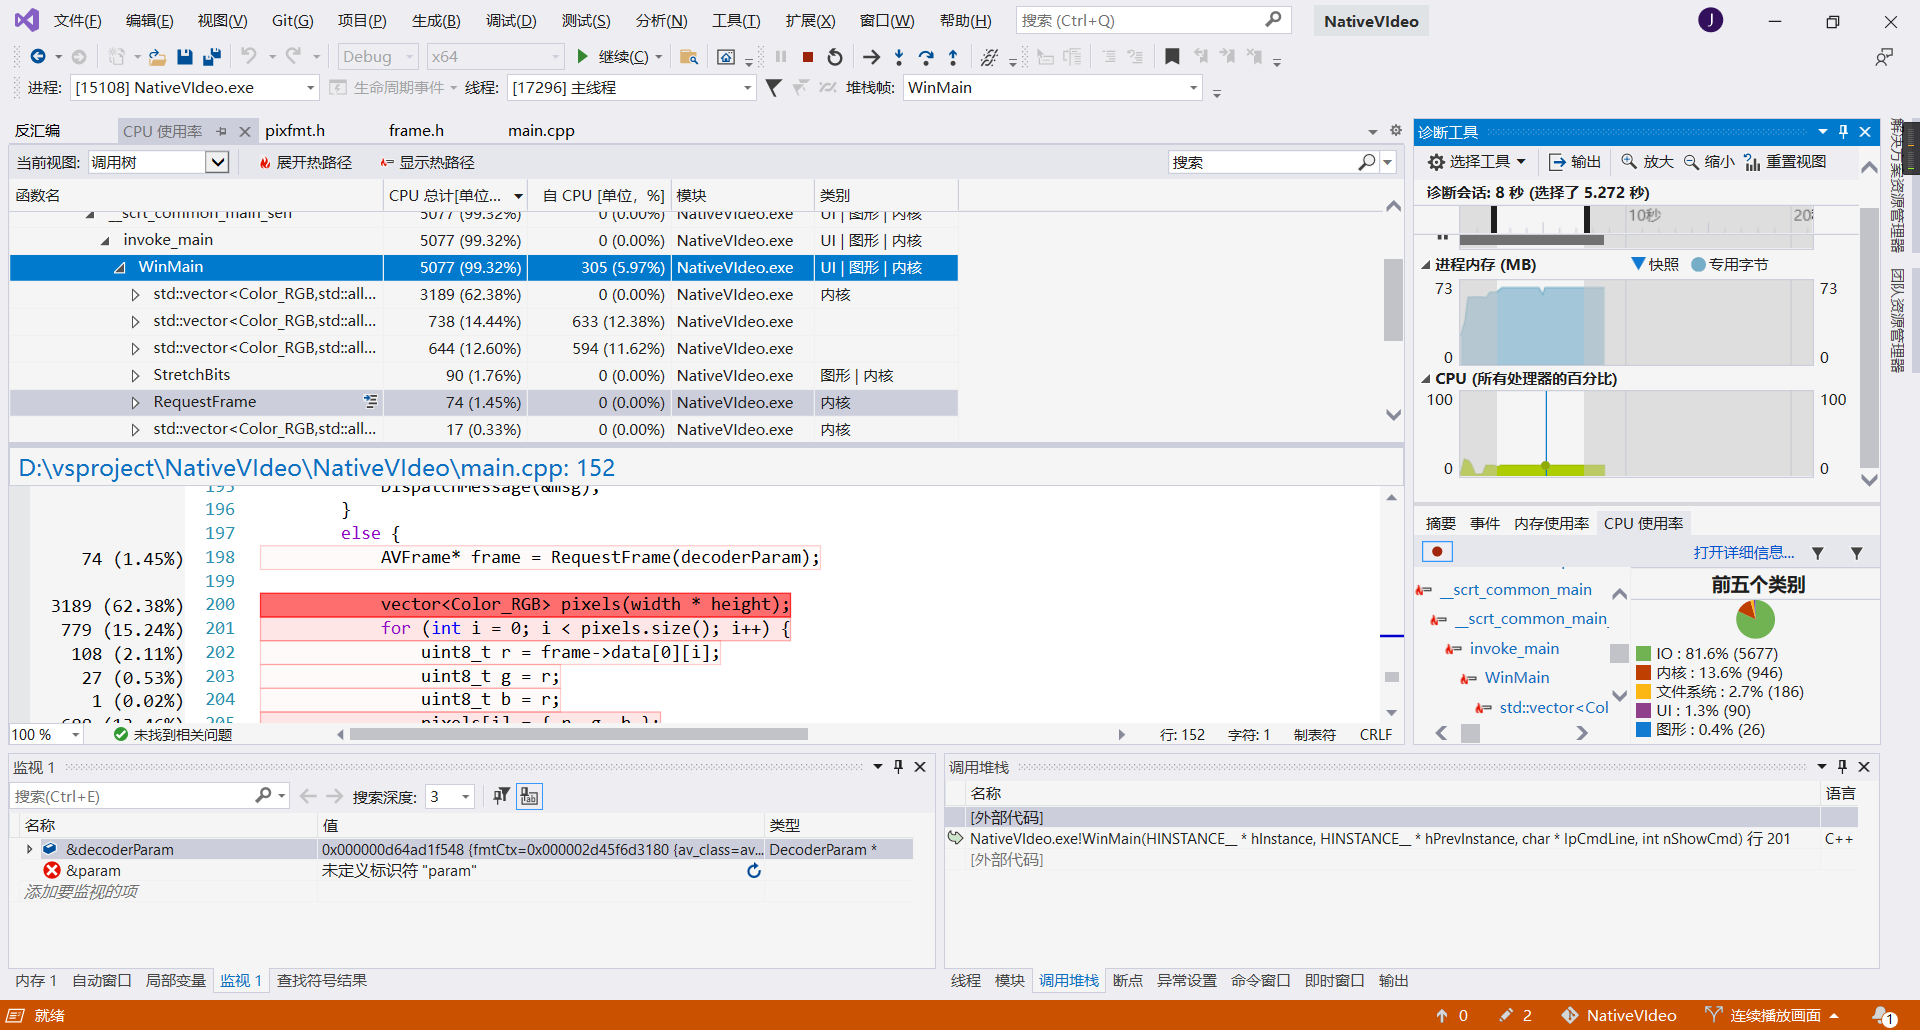
可以清晰看到那一句代码,哪一个函数,占用了多少CPU,利用它可以很方便的找到最需要优化的地方。可以看到vector的分配占用了大部分的CPU时间,待会我们再搞搞它。
彩色画面
FFmpeg 自带有函数可以帮我们处理颜色编码的转换,为此我们需要引入新的头文件:
// ...
#include <libswscale/swscale.h>
#pragma comment(lib, "swscale.lib")
// ...
然后编写一个新函数用来转换颜色编码
vector<Color_RGB> GetRGBPixels(AVFrame* frame) {
	static SwsContext* swsctx = nullptr;
	swsctx = sws_getCachedContext(
		swsctx,
		frame->width, frame->height, (AVPixelFormat)frame->format,
		frame->width, frame->height, AVPixelFormat::AV_PIX_FMT_BGR24, NULL, NULL, NULL, NULL);

	vector<Color_RGB> buffer(frame->width * frame->height);
	uint8_t* data[] = { (uint8_t*)&buffer[0] };
	int linesize[] = { frame->width * 3 };
	sws_scale(swsctx, frame->data, frame->linesize, 0, frame->height, data, linesize);

	return buffer;
}
sws_scale 函数可以对画面进行缩放,同时还能改变颜色编码,这里我们不需要进行缩放,所以 width 和 height 保持一致即可。
然后在解码后调用:
// ...
AVFrame* frame = RequestFrame(decoderParam);

vector<Color_RGB> pixels = GetRGBPixels(frame);

av_frame_free(&frame);

StretchBits(window, pixels, width, height);
// ...
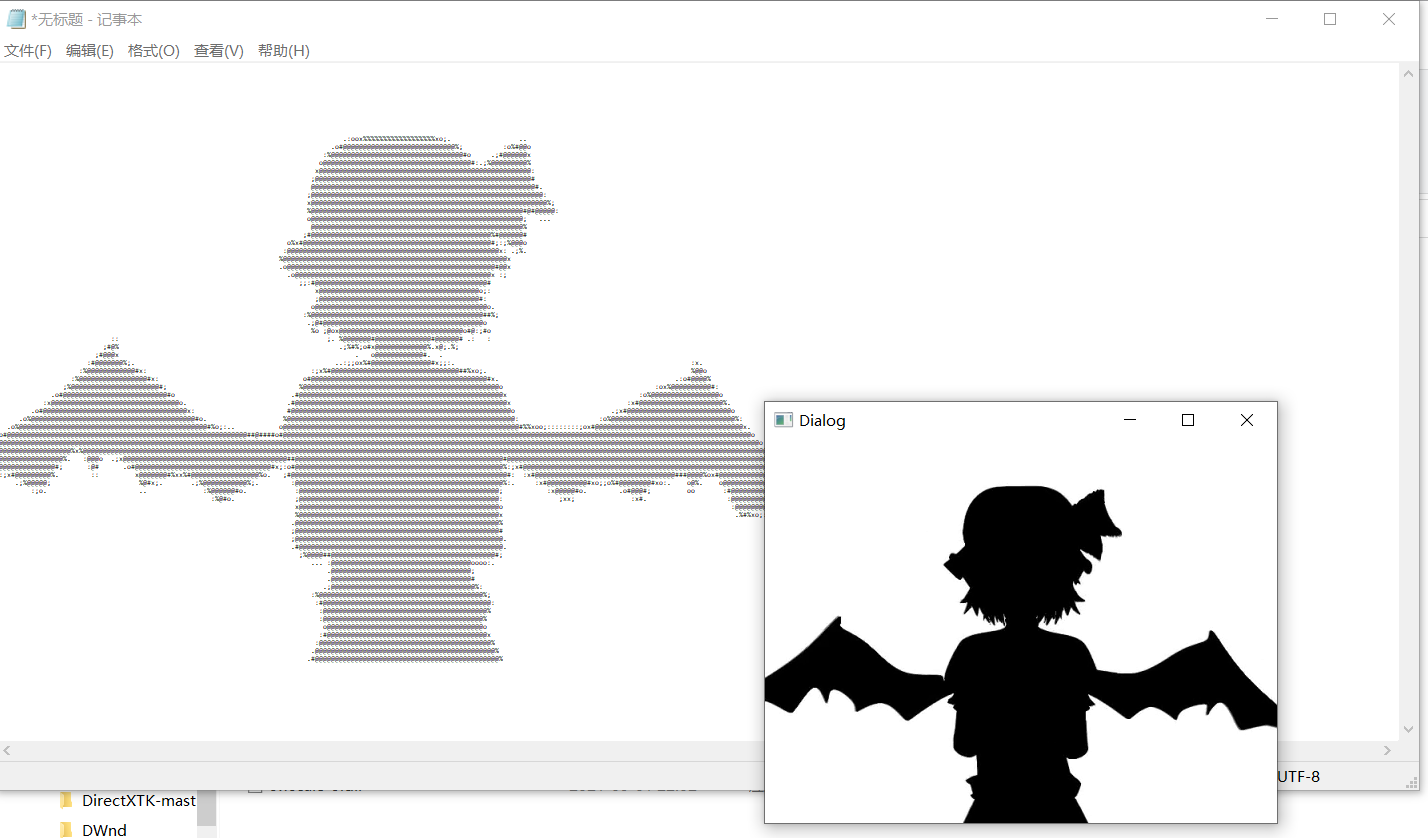
效果还不错:

接下来稍微优化下代码,在 Debug 模式下,vector 分配内存似乎需要消耗不少性能,我们想办法在消息循环前就分配好。
vector<Color_RGB> GetRGBPixels(AVFrame* frame, vector<Color_RGB>& buffer) {
	static SwsContext* swsctx = nullptr;
	swsctx = sws_getCachedContext(
		swsctx,
		frame->width, frame->height, (AVPixelFormat)frame->format,
		frame->width, frame->height, AVPixelFormat::AV_PIX_FMT_BGR24, NULL, NULL, NULL, NULL);

	uint8_t* data[] = { (uint8_t*)&buffer[0] };
	int linesize[] = { frame->width * 3 };
	sws_scale(swsctx, frame->data, frame->linesize, 0, frame->height, data, linesize);

	return buffer;
}

// ...
InitDecoder(filePath.c_str(), decoderParam);
auto& width = decoderParam.width;
auto& height = decoderParam.height;
auto& fmtCtx = decoderParam.fmtCtx;
auto& vcodecCtx = decoderParam.vcodecCtx;

vector<Color_RGB> buffer(width * height);
// ...
while (1) {
// ...
vector<Color_RGB> pixels = GetRGBPixels(frame, buffer);
// ...
}
这下即使是Debug模式下也不会卡成ppt了。
正确的播放速度
目前我们的画面播放速度,是取决于你的CPU运算速度,那要如何控制好每一帧的呈现时机呢?一个简单的想法,是先获取视频的帧率,计算出每一帧应当间隔多长时间,然后在每一帧呈现过后,调用 Sleep 函数延迟,总之先试试:
AVFrame* frame = RequestFrame(decoderParam);

vector<Color_RGB> pixels = GetRGBPixels(frame, buffer);

av_frame_free(&frame);

StretchBits(window, pixels, width, height);

double framerate = (double)vcodecCtx->framerate.den / vcodecCtx->framerate.num;
Sleep(framerate * 1000);
AVCodecContext::framerate 可以获取视频的帧率,代表每秒需要呈现多少帧,他是 AVRational 类型,类似于分数,num 是分子,den 是分母。这里我们把他倒过来,再乘以1000得出每帧需要等待的毫秒数。
但实际观感发现速度是偏慢的,这是因为解码和渲染本身就要消耗不少时间,再和Sleep等待的时间叠加,实际上每帧间隔的时间是拉长了的,下面我们尝试解决这个问题:
// ...
#include <chrono>
#include <thread>
// ...

using namespace std::chrono;
// ...

int WINAPI WinMain (
	_In_ HINSTANCE hInstance,
	_In_opt_ HINSTANCE hPrevInstance,
	_In_ LPSTR lpCmdLine,
	_In_ int nShowCmd
) {
// ...

	auto currentTime = system_clock::now();

	MSG msg;
	while (1) {
		BOOL hasMsg = PeekMessage(&msg, NULL, 0, 0, PM_REMOVE);
		if (hasMsg) {
			// ...
		} else {
			// ...

			av_frame_free(&frame);

			double framerate = (double)vcodecCtx->framerate.den / vcodecCtx->framerate.num;
			std::this_thread::sleep_until(currentTime + milliseconds((int)(framerate * 1000)));
			currentTime = system_clock::now();

			StretchBits(window, pixels, width, height);
		}
	}
std::this_thread::sleep_until 能够延迟到指定的时间点,利用这个特性,即使解码和渲染占用了时间,也不会影响整体延迟时间,除非你的解码渲染一帧的时间已经超过了每帧间隔时间。
放心,这个笨拙的方式当然不会是我们的最终方案。
硬件解码
使用这个程序在我的笔记本上还是能流畅播放 1080p24fps 视频的,但是当播放 1080p60fps 视频的时候明显跟不上了,我们先来看看是哪里占用CPU最多:
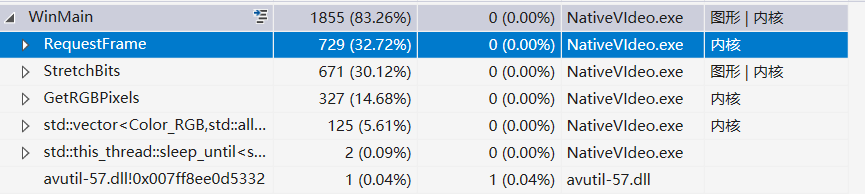
显然 RequestFrame 占用了不少资源,这是解码使用的函数,下面尝试使用硬件解码,看看能不能提高效率:
void InitDecoder(const char* filePath, DecoderParam& param) {
	// ...

	// 启用硬件解码器
	AVBufferRef* hw_device_ctx = nullptr;
	av_hwdevice_ctx_create(&hw_device_ctx, AVHWDeviceType::AV_HWDEVICE_TYPE_DXVA2, NULL, NULL, NULL);
	vcodecCtx->hw_device_ctx = hw_device_ctx;

	param.fmtCtx = fmtCtx;
	param.vcodecCtx = vcodecCtx;
	param.width = vcodecCtx->width;
	param.height = vcodecCtx->height;
}

vector<Color_RGB> GetRGBPixels(AVFrame* frame, vector<Color_RGB>& buffer) {
	AVFrame* swFrame = av_frame_alloc();
	av_hwframe_transfer_data(swFrame, frame, 0);
	frame = swFrame;

	static SwsContext* swsctx = nullptr;

	// ...

	sws_scale(swsctx, frame->data, frame->linesize, 0, frame->height, data, linesize);

	av_frame_free(&swFrame);

	return buffer;
}
先通过 av_hwdevice_ctx_create 创建一个硬件解码设备,再把设备指针赋值到 AVCodecContext::hw_device_ctx 即可,AV_HWDEVICE_TYPE_DXVA2 是一个硬件解码设备的类型,和你运行的平台相关,在Windows平台,通常使用 AV_HWDEVICE_TYPE_DXVA2 或者 AV_HWDEVICE_TYPE_D3D11VA,兼容性最好,因为后面要用 dx9 渲染,所以我们先用dxva2。
此时解码出来的 AVFrame,是没法直接访问到原始画面信息的,因为解码出来的数据都还在GPU显存当中,需要通过 av_hwframe_transfer_data 复制出来(这就是播放器里面的copy-back选项),而且出来的颜色编码变成了 AV_PIX_FMT_NV12,并非之前常见的 AV_PIX_FMT_YUV420P,但这不需要担心,sws_scale 能帮我们处理好。
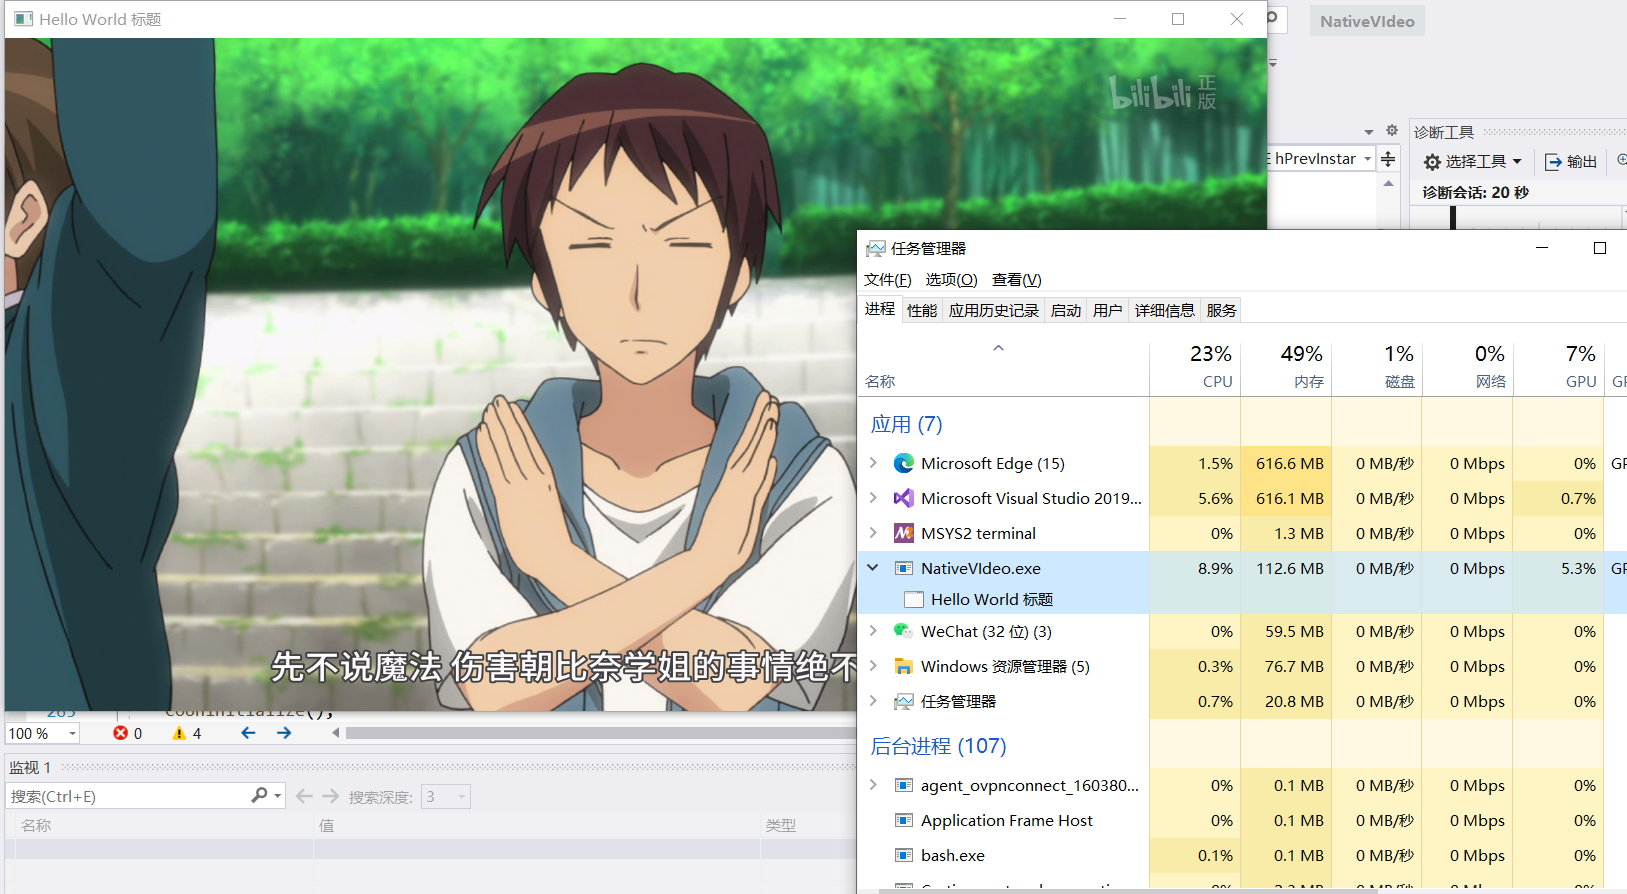
运行程序后,在任务管理器确实看到了GPU有一定的占用了:

但还是不够流畅,我们再看看性能分析:
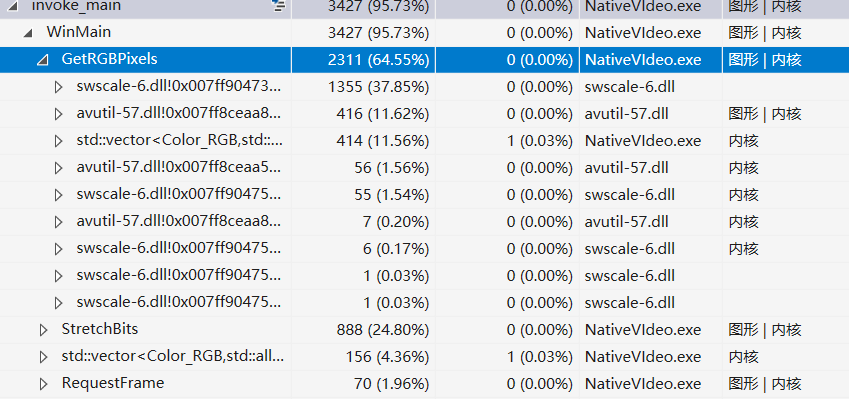
看来是 sws_scale 函数消耗了性能,但这是FFmpeg的函数,我们无法从他的内部进行优化,总之先暂时搁置吧,以后再解决它。
使用D3D9渲染画面
GDI 渲染那都是古法了,现在我们整点近代的方法:Direct3D 9 渲染。
先引入必要的头文件:
#include <d3d9.h>
#pragma comment(lib, "d3d9.lib")
还有一个微软给我们的福利,ComPtr:
#include <wrl.h>
using Microsoft::WRL::ComPtr;
因为接下来我们会大量使用 COM(组件对象模型)技术,有了ComPtr会方便不少。关于 COM 可以说的太多,实在没法在这篇文章说的太细,建议先去阅读相关资料有点了解了再往下看。
接下来初始化D3D9设备
// ...

ShowWindow(window, SW_SHOW);

// D3D9
ComPtr<IDirect3D9> d3d9 = Direct3DCreate9(D3D_SDK_VERSION);
ComPtr<IDirect3DDevice9> d3d9Device;

D3DPRESENT_PARAMETERS d3dParams = {};
d3dParams.Windowed = TRUE;
d3dParams.SwapEffect = D3DSWAPEFFECT_DISCARD;
d3dParams.BackBufferFormat = D3DFORMAT::D3DFMT_X8R8G8B8;
d3dParams.Flags = D3DPRESENTFLAG_LOCKABLE_BACKBUFFER;
d3dParams.BackBufferWidth = width;
d3dParams.BackBufferHeight = height;
d3d9->CreateDevice(D3DADAPTER_DEFAULT, D3DDEVTYPE_HAL, window, D3DCREATE_HARDWARE_VERTEXPROCESSING, &d3dParams, d3d9Device.GetAddressOf());

auto currentTime = system_clock::now();
// ...
使用 ComPtr 这个C++模板类去包装COM指针,就无需操心资源释放问题了,变量生命周期结束会自动调用 Release 释放资源。
创建设备最重要的参数是 D3DPRESENT_PARAMETERS 结构,Windowed = TRUE 设置窗口模式,我们现在也不需要全屏。SwapEffect 是交换链模式,选 D3DSWAPEFFECT_DISCARD 就行。BackBufferFormat 比较重要,必须选择 D3DFMT_X8R8G8B8,因为只有他能同时作为后缓冲格式和显示格式(见下图),而且 sws_scale 也能正确转换到这种格式。

Flags 必须是 D3DPRESENTFLAG_LOCKABLE_BACKBUFFER,因为待会我们要直接把数据写入后缓冲,咱不整3D纹理层了。
重新调整下 GetRGBPixels 函数:
void GetRGBPixels(AVFrame* frame, vector<uint8_t>& buffer, AVPixelFormat pixelFormat, int byteCount) {
	AVFrame* swFrame = av_frame_alloc();
	av_hwframe_transfer_data(swFrame, frame, 0);
	frame = swFrame;

	static SwsContext* swsctx = nullptr;
	swsctx = sws_getCachedContext(
		swsctx,
		frame->width, frame->height, (AVPixelFormat)frame->format,
		frame->width, frame->height, pixelFormat, NULL, NULL, NULL, NULL);

	uint8_t* data[] = { &buffer[0] };
	int linesize[] = { frame->width * byteCount };
	sws_scale(swsctx, frame->data, frame->linesize, 0, frame->height, data, linesize);

	av_frame_free(&swFrame);
}
添加了参数 pixelFormat 可以自定义输出的像素格式,目的是为了待会输出 AV_PIX_FMT_BGRA 格式的数据,它对应的正是 D3DFMT_X8R8G8B8,而且不同的格式,每一个像素占用字节数量也不一样,所以还需要一个 byteCount 参数表示每像素字节数。当然 vector<Color_RGB> 我们也不用了,改为通用的 vector<uint8_t>。
重新调整 StretchBits 函数:
void StretchBits(IDirect3DDevice9* device, const vector<uint8_t>& bits, int width, int height) {
	ComPtr<IDirect3DSurface9> surface;
	device->GetBackBuffer(0, 0, D3DBACKBUFFER_TYPE_MONO, surface.GetAddressOf());

	D3DLOCKED_RECT lockRect;
	surface->LockRect(&lockRect, NULL, D3DLOCK_DISCARD);

	memcpy(lockRect.pBits, &bits[0], bits.size());

	surface->UnlockRect();

	device->Present(NULL, NULL, NULL, NULL);
}
这里就是把画面数据写入后缓冲,然后调用 Present 就会显示在窗口中了。
最后调整 main 函数的一些内容:
// ...

vector<uint8_t> buffer(width * height * 4);

auto window = CreateWindow(className, L"Hello World 标题", WS_OVERLAPPEDWINDOW, 0, 0, decoderParam.width, decoderParam.height, NULL, NULL, hInstance, NULL);
// ...

AVFrame* frame = RequestFrame(decoderParam);

GetRGBPixels(frame, buffer, AVPixelFormat::AV_PIX_FMT_BGRA, 4);

av_frame_free(&frame);

double framerate = (double)vcodecCtx->framerate.den / vcodecCtx->framerate.num;
std::this_thread::sleep_until(currentTime + milliseconds((int)(framerate * 1000)));
currentTime = system_clock::now();

StretchBits(d3d9Device.Get(), buffer, width, height);
// ...
注意buffer的大小有变化,GetRGBPixels 的参数需要使用 AV_PIX_FMT_BGRA,StretchBits 改为传入 d3d9设备指针。
运行程序,看起来和之前没啥区别,但其实此时的CPU占用会稍微降低,而GPU占用会提升一些。
告别 sws_scale
先把窗口调整为无边框,这样看起来更酷,也让画面的比例稍显正常:
// ...

auto window = CreateWindow(className, L"Hello World 标题", WS_POPUP, 100, 100, 1280, 720, NULL, NULL, hInstance, NULL);
// ...
前面曾经提到,硬解出来的 AVFrame 没有原始画面信息,但我们去看它的format值,会发现对应的是 AV_PIX_FMT_DXVA2_VLD:

在注释里面提到:data[3] 是 一个 LPDIRECT3DSURFACE9,也就是 IDirect3DSurface9*,那我们就可以直接把这个 Surface 呈现到窗口,不需要再把画面数据从GPU显存拷贝回内存了,sws_scale 也可以扔了。
我们写一个新的函数 RenderHWFrame 去做这件事,StretchBits 和 GetRGBPixels 都不再需要了:
void RenderHWFrame(HWND hwnd, AVFrame* frame) {
	IDirect3DSurface9* surface = (IDirect3DSurface9*)frame->data[3];
	IDirect3DDevice9* device;
	surface->GetDevice(&device);

	ComPtr<IDirect3DSurface9> backSurface;
	device->GetBackBuffer(0, 0, D3DBACKBUFFER_TYPE_MONO, backSurface.GetAddressOf());

	device->StretchRect(surface, NULL, backSurface.Get(), NULL, D3DTEXF_LINEAR);

	device->Present(NULL, NULL, hwnd, NULL);
}

int WINAPI WinMain (
	_In_ HINSTANCE hInstance,
	_In_opt_ HINSTANCE hPrevInstance,
	_In_ LPSTR lpCmdLine,
	_In_ int nShowCmd
) {
// ...

AVFrame* frame = RequestFrame(decoderParam);

double framerate = (double)vcodecCtx->framerate.den / vcodecCtx->framerate.num;
std::this_thread::sleep_until(currentTime + milliseconds((int)(framerate * 1000)));
currentTime = system_clock::now();

RenderHWFrame(window, frame);

av_frame_free(&frame);
// ...
在不同的d3d9设备之间共享资源是比较麻烦的,所以我们直接获取到FFmepg创建的d3d9设备,然后调用 Present 的时候指定窗口句柄,就可以让画面出现在我们自己的窗口中了。