postcss 入坑指南
目标:
- 掌握 postcss 的使用
- 自定义 postcss 插件
- 掌握 stylelint 的使用
- 自定义 stylelint rule
- 扩展 css parser 解释器
这篇文章大部分工作都在调试 postcss 源码,涉及到的源码见 https://github.com/gaollard/postcss-demo/blob/master/doc.md
1. postcss 是什么
在聊 postcss 之前,我们需要知道什么是 CSS 后处理工具。我们比较熟悉的 Less/Sass/Stylus,这类工具都属于CSS 预处理工具。预处理指的是通过特殊的规则,将非 css 文本格式最终生成 css 文件,而 postcss 则是对 CSS 进行处理,最终生成CSS。
可能大部分前端开发者都使用过 Autoprefixer 这款插件,它以 Can I Use (浏览器兼容性支持) 为基础,自动处理兼容性问题,下面是一个简单的例子:
// Autoprefixer 处理前的CSS样式
.container {
	display: flex;
}
.item {
	flex: 1;
}

// Autoprefixer 处理后的CSS样式
.container {
  display: -webkit-box;
  display: -webkit-flex;
  display: -ms-flexbox;
  display: flex;
}
.item {
  -webkit-box-flex: 1;
  -webkit-flex: 1;
  -ms-flex: 1;
  flex: 1;
}
在这个例子中过,通过使用 Autoprefixer 插件,帮助我们自动处理浏览器前缀,极大的提高了编码效率。其实,Autoprefixer 正是 postcss 众多插件中的一款,postcss 提供的简洁明了API,并且文档十分详细,这为其生态建设提供了有力的支撑。
点击 这里 查看更多可用插件。
2. postcss 如何使用
两个主要的功能:
- 转换 css,这是我们最常使用的
- 获取 css ast,当我们编写插件时需要掌握
2.1 转换 css
这里只介绍 postcss API,如果您使用 webpack,只需要将 postcss 包装为 postcss-loader 即可。
// 01-simple-demo
const autoprefixer = require('autoprefixer')
const postcss = require('postcss')
const precss = require('precss')
const fs = require('fs')
const path = require('path')

const src = path.resolve('./src/app.css');
const dest = path.resolve('./dest/app.css');

fs.readFile(src, (err, css) => {
  postcss([precss, autoprefixer]) // [precss, autoprefixer] 为使用的插件列表,返回 Processor 对象
    .process(css) // process 接收 css 资源
    .then(result => { // result 为 Result 实例
      fs.writeFile(dest, result.css, function(err) {
        if (err) throw err;
      });
    })
})
相关源码:
- postcss/lib/postcss.js
- postcss/lib/processor.js
2.2 获取 CSS AST
// 02-use-parser
const postcss = require('postcss')
const fs = require('fs')
const path = require('path')

const src = path.resolve('./src/app.css');
const css = fs.readFileSync(src);
const root = postcss.parse(css);

console.log(root); // CSS 抽象语法树
相关源码:
- postcss/lib/parse.js
- postcss/lib/parser.js
3. postcss 的运行过程
主要步骤:
- 解释:接收输入的css,将css内容处理成css抽象语法树。
- 转换:根据配置插件的顺序对树型结构的 AST 进行操作。
- 输出:最终将处理后获得的 AST S 对象输出为 css 文件。
主要内容:
- 标记器:将 css 拆解为 token 序列,为语法树提供基础(postcss/lib/tokenize.js ...)
- 解释器:通过语法分享,将 token 序列转换为语法树(postcss/lib/parser.js ...)
- 处理器:根据插件配置,对语法树做一些转换操作(postcss/lib/lazy-result.js ...)
最不容易理解的也是最难的点:CSS AST 的生成以及操作。
4. postcss CSS AST
你暂且将 AST 理解一个节点树,这些节点不完全相同,它们继承自同一个节点(源码中为Container)。
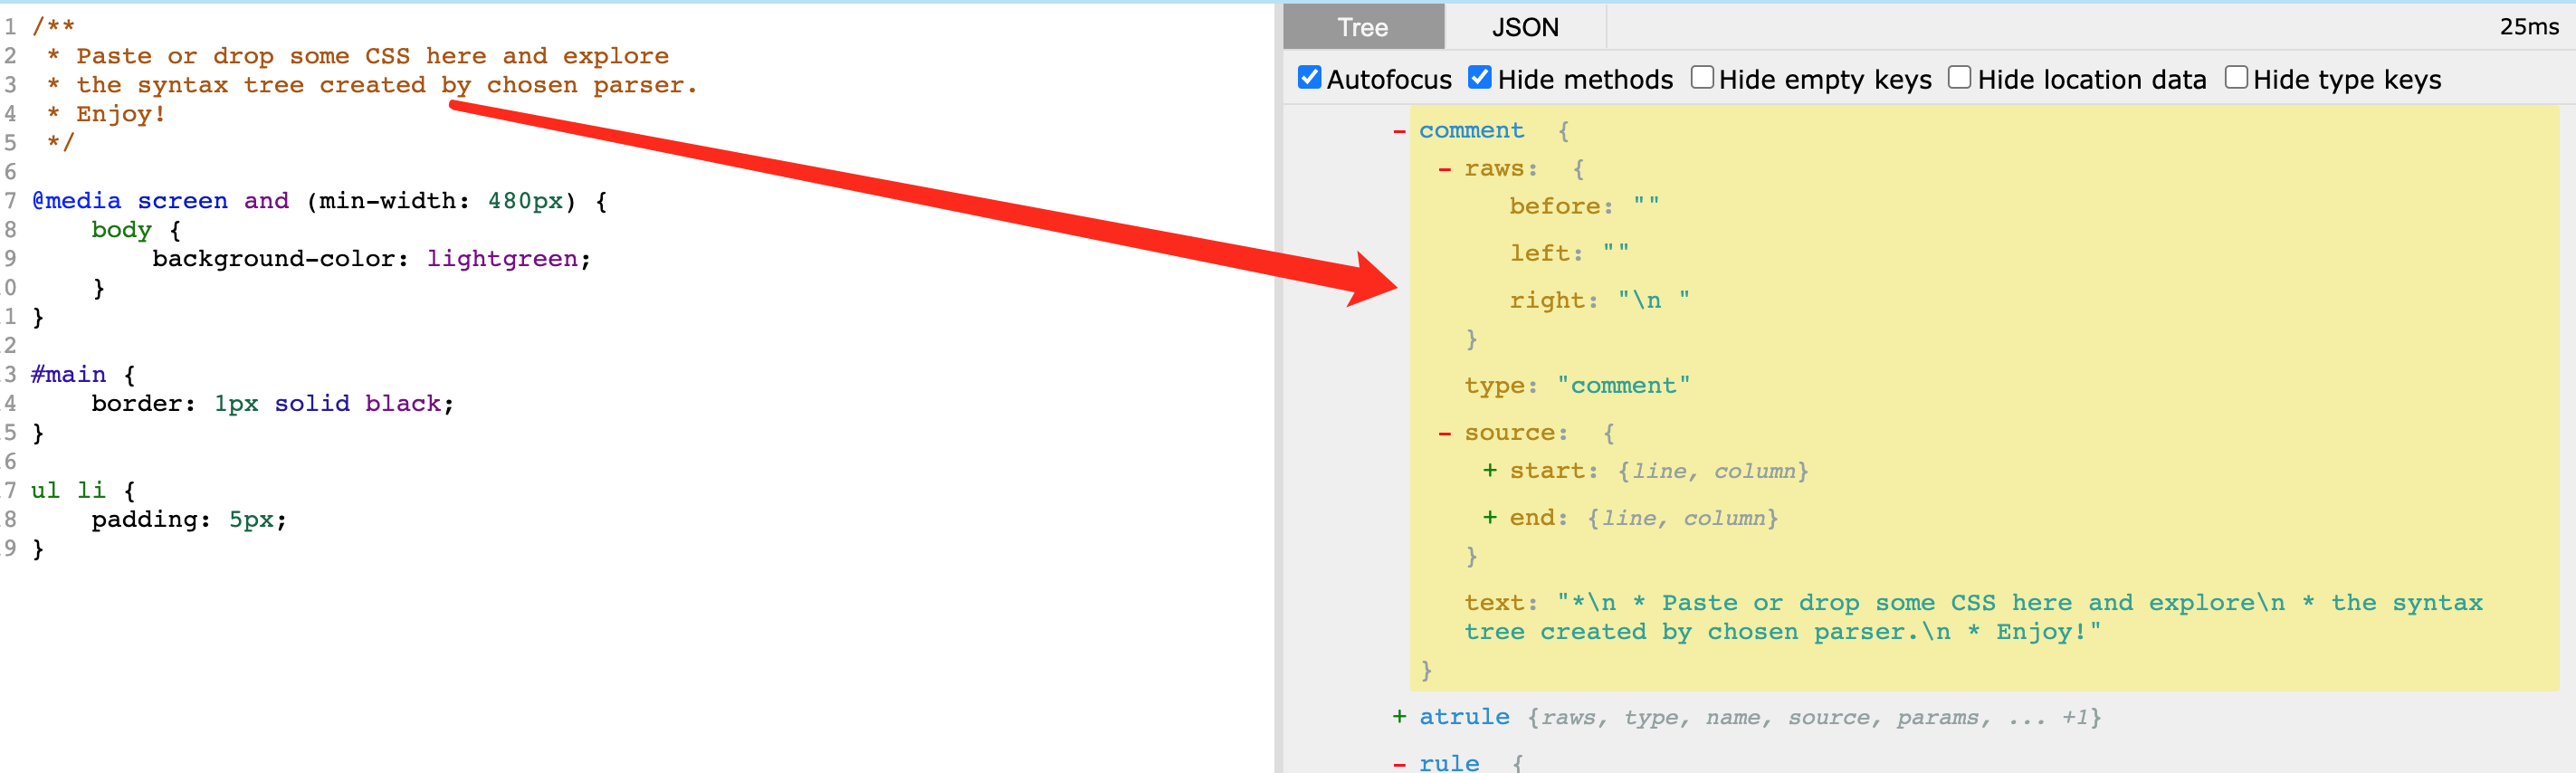
在学习 postcss 初期,通过查看可视化的 postcss css 语法树,可以帮助你理解。使用使用 css ast 在线工具,下图为一个很标准的 css 文档,有注释、媒体查询,以及选择器样式:
/**
 * Paste or drop some CSS here and explore
 * the syntax tree created by chosen parser.
 * Enjoy!
 */

@media screen and (min-width: 480px) {
    body {
        background-color: lightgreen;
    }
}

#main {
    border: 1px solid black;
}

ul li {
	padding: 5px;
}
上面的 css 最终会处理为下图结构,通过打印信息我们可以发现树型结构的 JS 对象是一个名为 Root 的构造函数,而起树型结构的 nodes 节点下还有 Common,AtRule, Rule 构造函数。
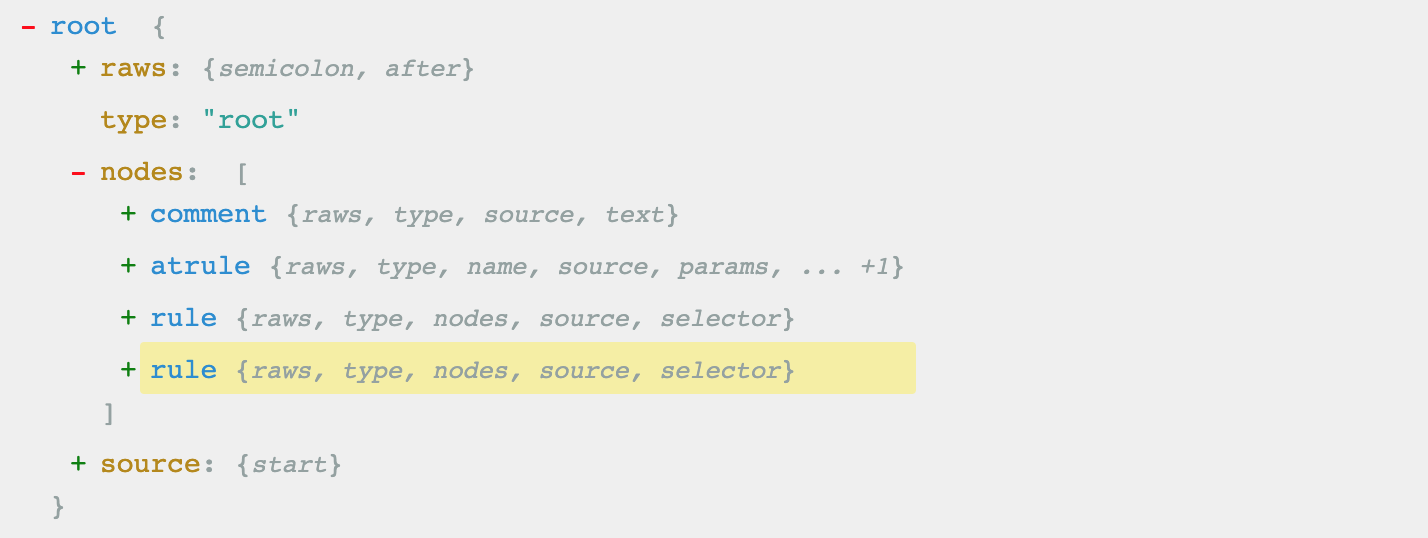
CSS AST 节点主要有以下构造类组成:
- Root: 根结点,整个处理过程基本上都在围绕着 Root,Commont,AtRule,Rule 都是它的子节点。
- Commont: css 中的注释信息,注释的内容在 comment.text 下。
- AtRule: 带@标识的部分,name 为标识名称,params 为标识参数。nodes 为内部包含的其他子节点,可以是 Commont,AtRule,Rule,这让我们可以自定义更多的规则。
- Declaration:每个 css 属性以及属性值就代表一个 declaration
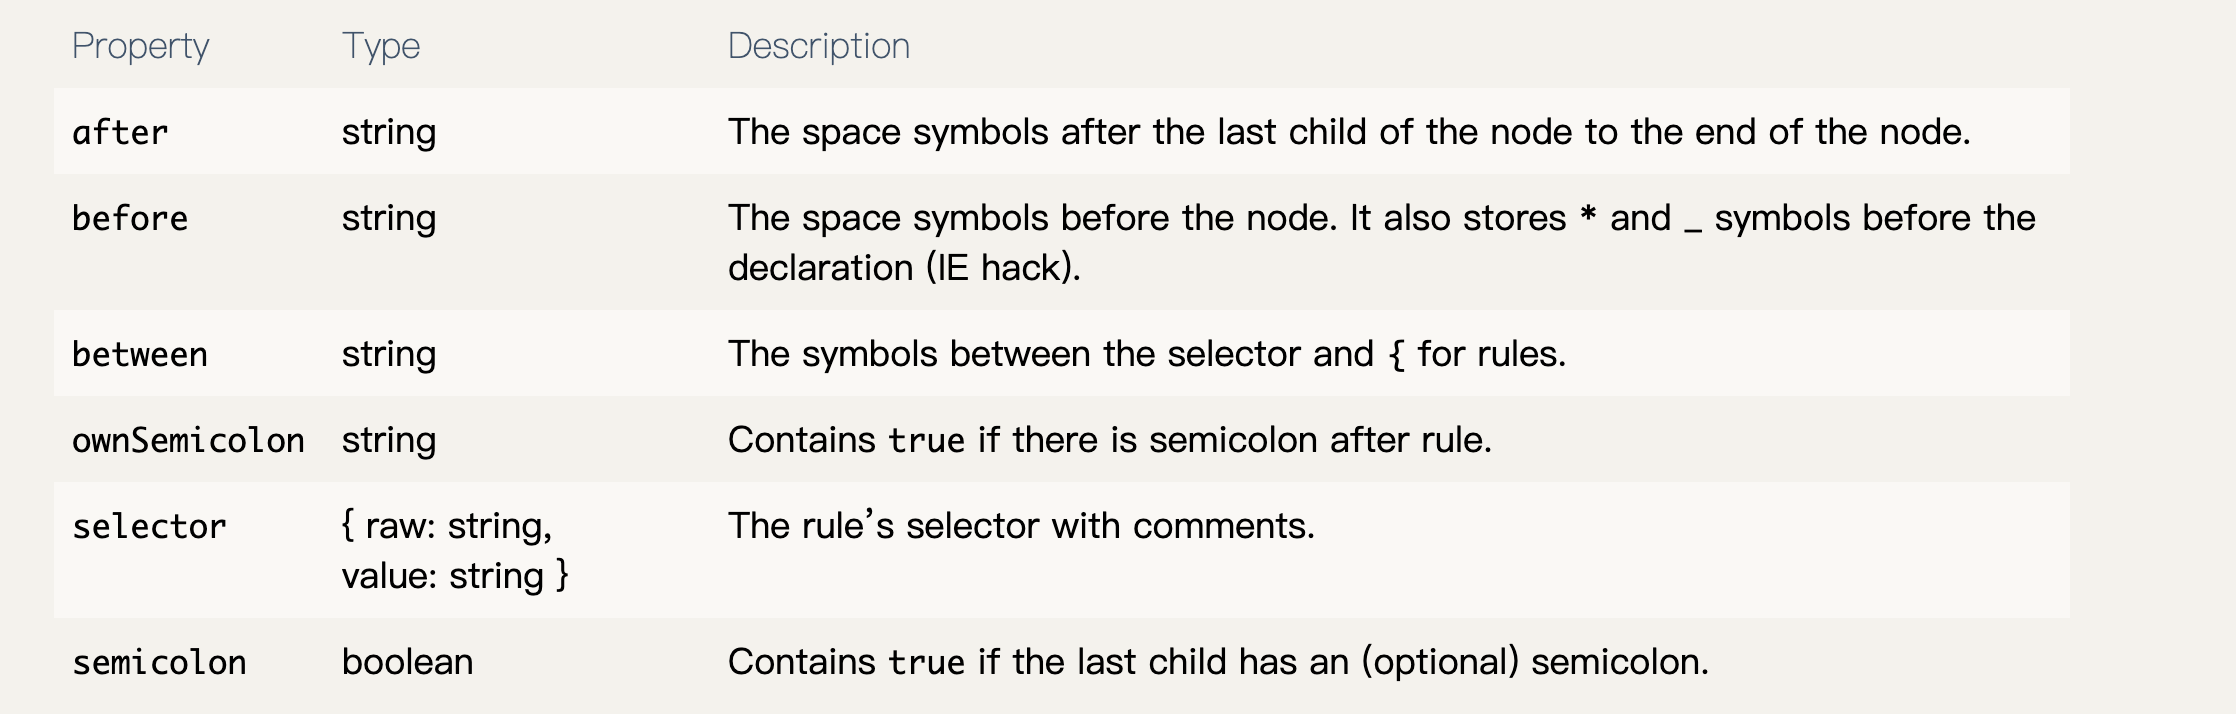
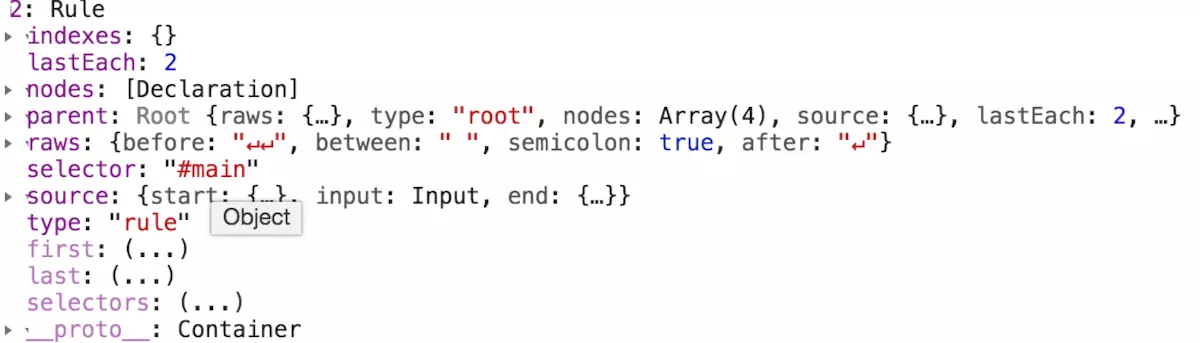
4.1 Rule 选择器节点
一个选择器代表一个Rule,选择器对应的样式列表 nodes 为 Declaration构造函数
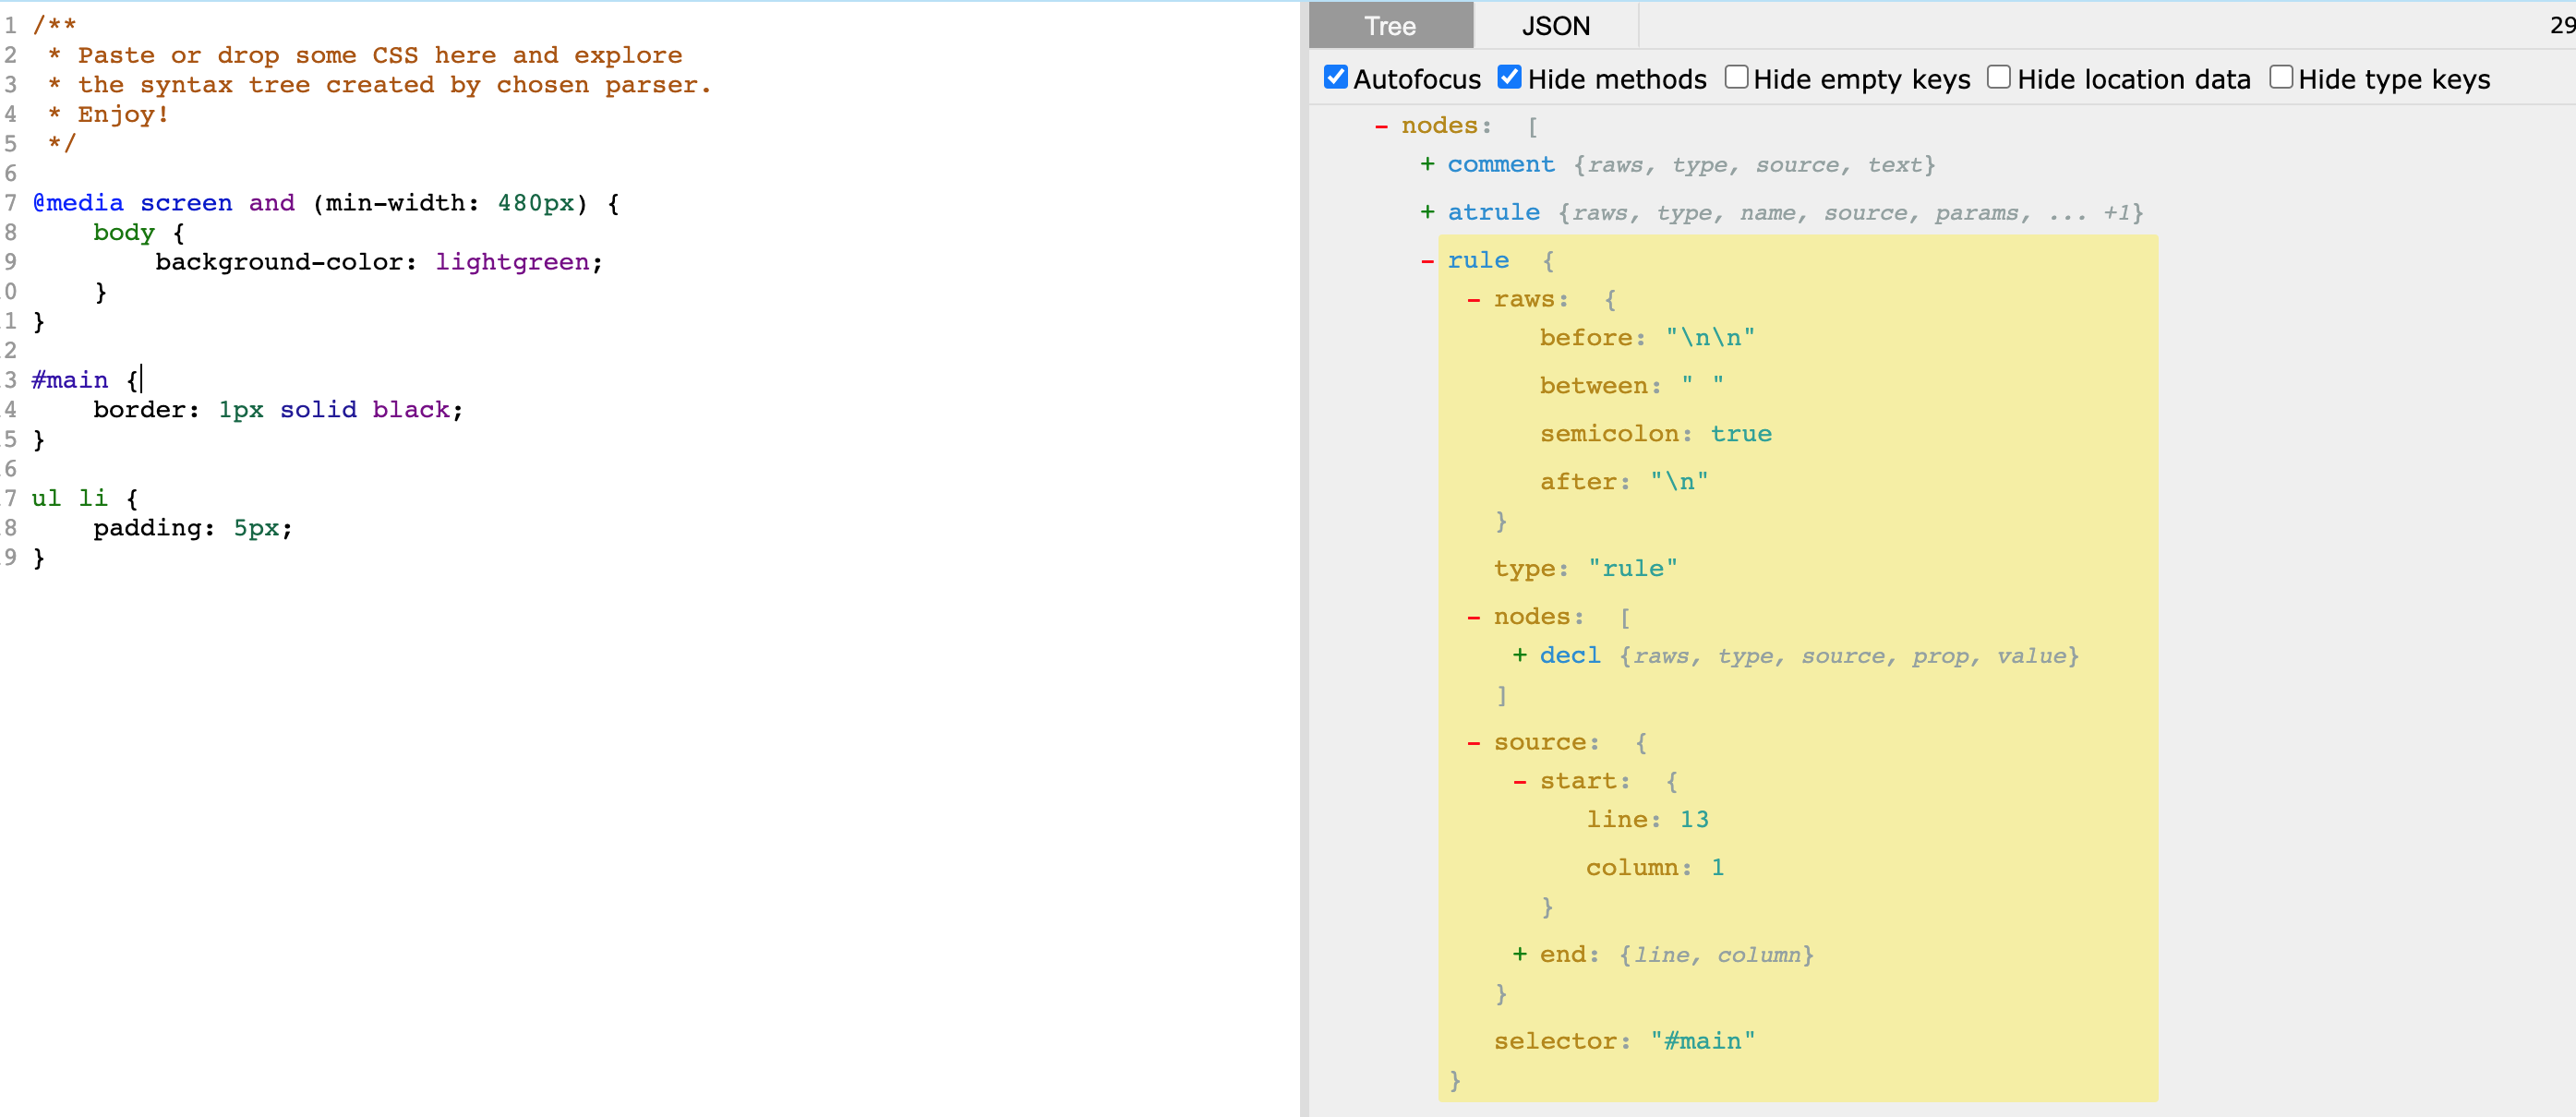
- raws
- before 距离前一个兄弟节点之间的内容
- between 选择器与 { 之间的内容
- semicolon 最后一个属性是否带分号
- after 最后一个属性 和 } 之间的内容
- type 节点类型
- nodes 子节点
- source
- selecter 选择器
大部分节点结构是类似的,如果你理解了 Rule 节点的结构,相信其他类型的节点对你也是很轻松的!
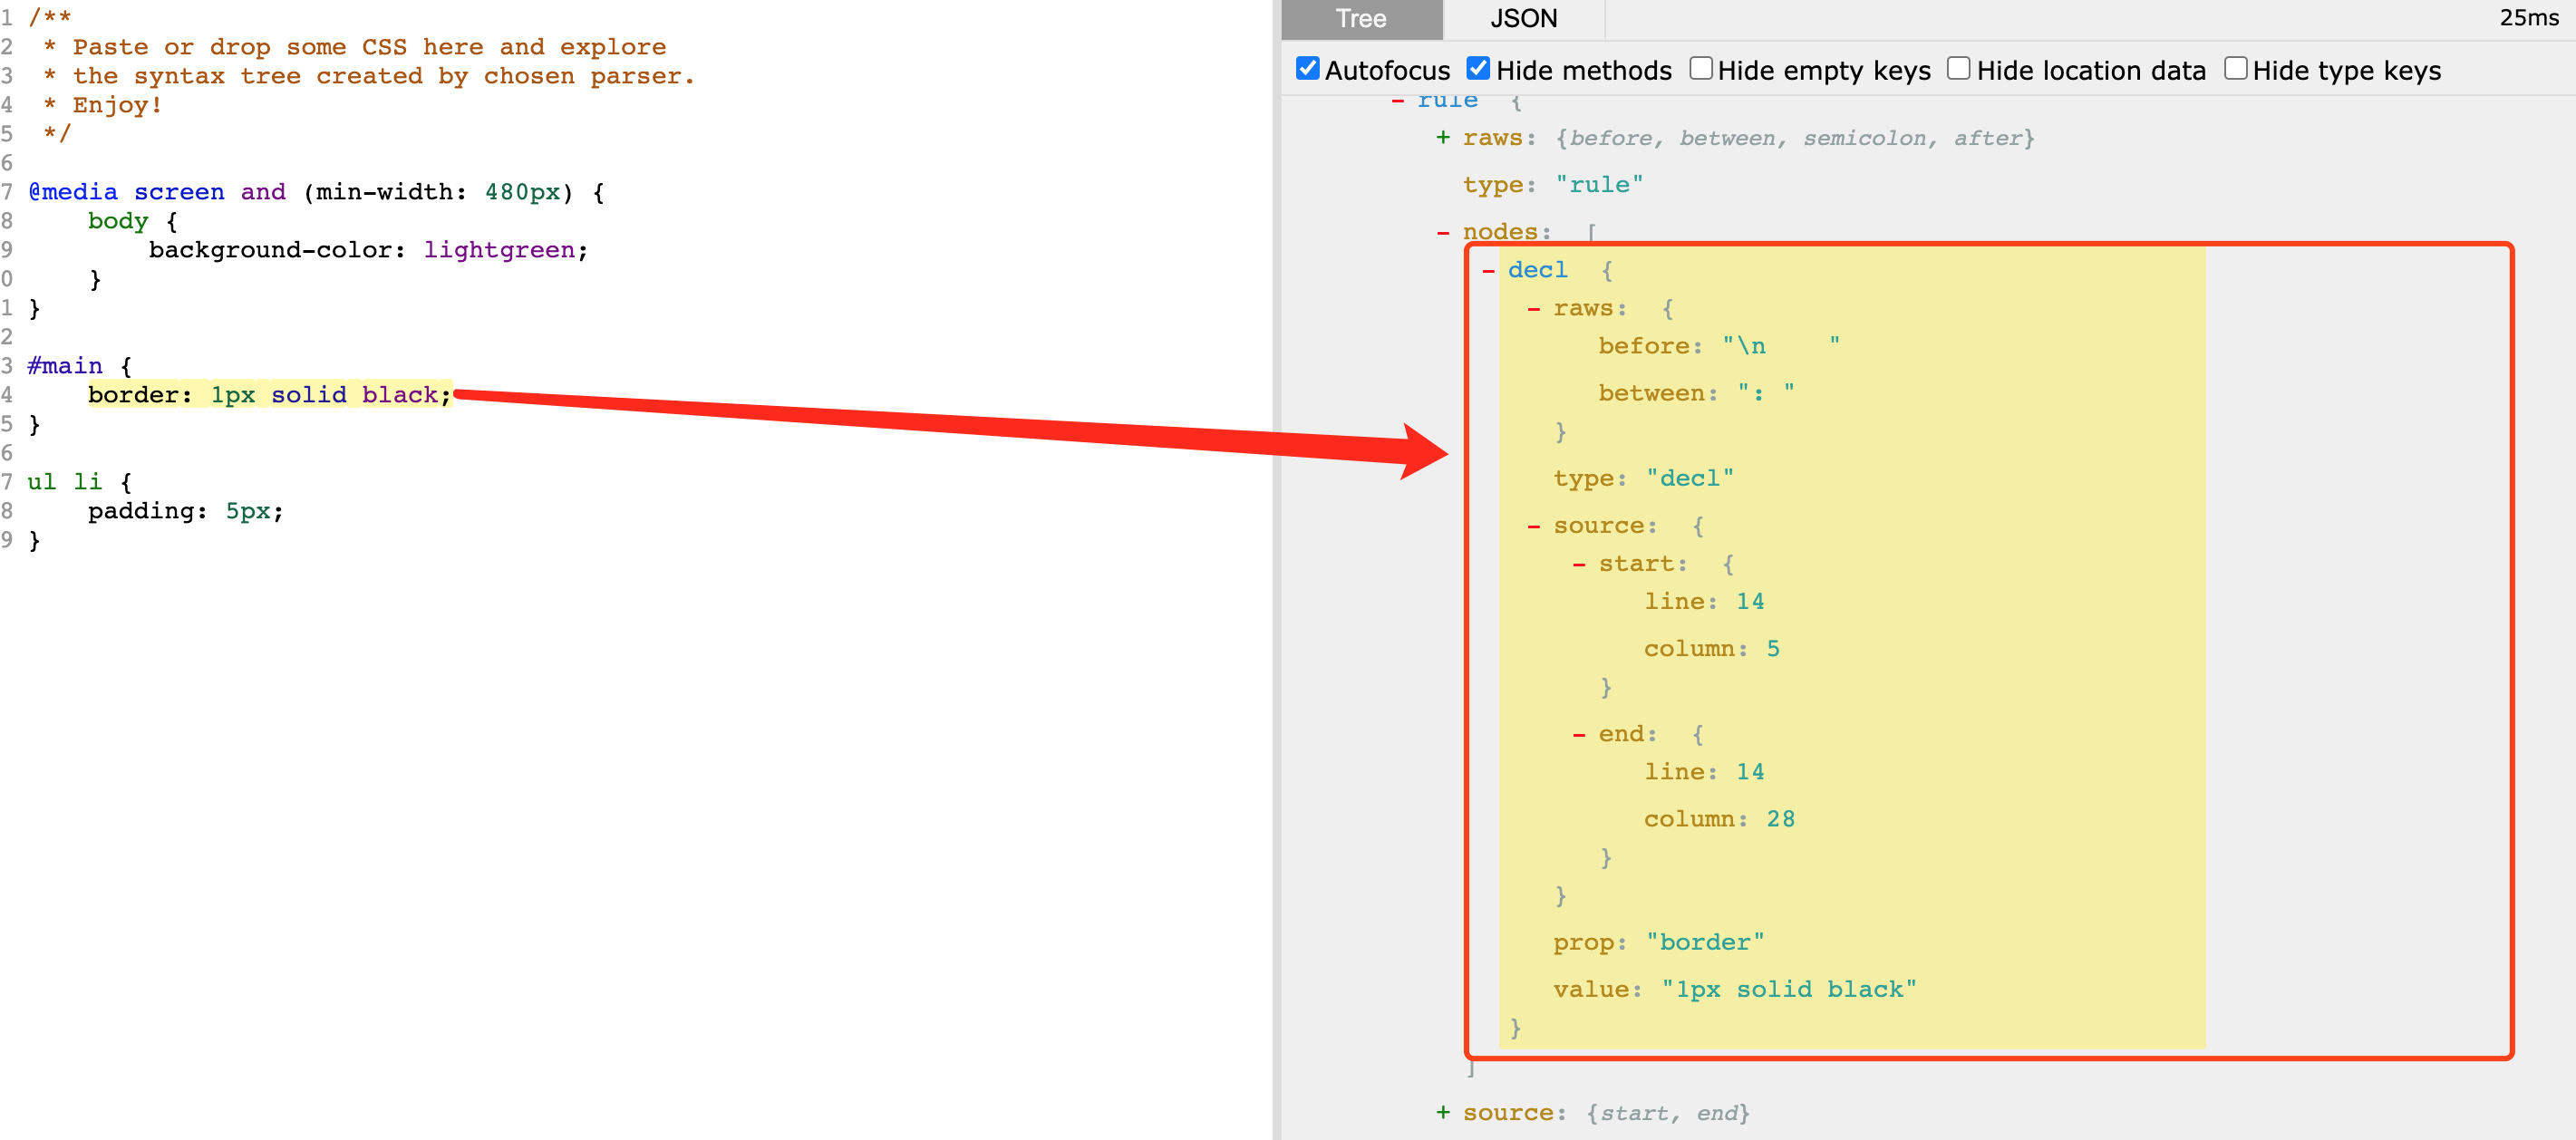
4.2 Declaration 属性节点
Declaration 是 css 样式属性,prop为样式属性,value为样式值。可给 Rule 手动添加样式属性,也可以修改prop,value。上文提到的 Autoprefixer 就是通过 clone 当前属性,修改 prop 并添加到选择器下,Declaration 节点非常简单:
4.3 Comment 注释节点
5. 各构造器方法和属性
大部分节点都继承了 Container,因此我们先看看公共属性:
- nodes 子节点
- parent 父节点
- raws 相当于分隔符集合
- source 位置范围
- type 节点类型
- last 该节点的子节点的最后一个
- first 该节点的子节点的第一个
- after() 在当前节点的后面插入一个节点,等价
node.parent.insertAfter(node, add)
- cleanRaws 代码格式化(保持缩进...)
- clone 节点克隆
- cloneBefore
- cloneAfter
- each 遍历儿子节点
- error 抛出一个错误
- every 条件遍历
- index 获取节点在父节点中的索引
- insertAfter
- insertBefore
- next
- positionInside Convert string index to line/column
- prepend
- push
- raw()
- remove()
- removeAll() Removes all children from the container and cleans their parent properties.
- removeChild
- replaceValues 用于遍历所有子孙节点 decl value
- root()
- some() Returns true if callback returns true for (at least) one of the container’s children.some()
- toJSON() 打印 JSON,使用 JSON.stringify() 有循环依赖
- toString() 获取转换后的 css
- walk() 遍历所有子孙节点,这个接口非常有用哦
- walkAtRules 遍历艾特节点
- walkComments 遍历注释节点
- walkRules 遍历选择器节点
- walkDecls 遍历属性节点
5.1 Rule
- 公共属性方法
- selector 选择器
- selectors 选择器数组
5.2 Declaration
5.3 Comment
6. 如何使用 postcss 插件
插件用于丰富 postcss 的功能。
插件编写文档
- https://www.postcss.parts
- https://github.com/himynameisdave/postcss-plugins
postcss([PluginA({}), PluginB({})])
  .process(css, {from: ``, to: ``})
  .then(result => {
  	// do ...
	}).catch(error => {
  	throw new Error(error)
	})
7. 如何编写一个 postcss 插件
上文中,我们对 css 处理后生成的 Root 以及其节点下的 Commont,AtRule,Rule, Declaration 有了基本的认识,那么我们是如何获得Root,又将拿这些构造函数做些什么呢。
7.1 css选择器深度校验
const fs = require('fs')
const path = require('path')
const postcss = require('postcss')
const css = fs.readFileSync(path.resolve(__dirname, './main.css'), 'utf8')

const checkDepth = postcss.plugin('check-depth', (opt) => {
  opt = opt || { depth: 3 }
  return root => {
    root.walkRules(rule => {
      let selector = rule.selector.replace(/(^\s*)|(\s*$)/g, '')
      if (selector.split(/\s/).length > opt.depth) {
        throw rule.error(`css selector depth is too long`)
      }
    })
  }
})

postcss([checkDepth({
  depth: 3
})])
  .process(css, { from: ``, to: `` })
  .then(result => {
    console.log(result);
  })
  .catch(error => {
    throw new Error(error)
  })
7.2 css属性替换
const postcss = require('postcss') // postcss

module.exports = postcss.plugin('px2rem', function(opts) {
  opts = opts || {};
  return function (root, result) {
    root.replaceValues(/\d+px/, { fast: 'px' }, string => {
      return opts.ratio * parseInt(string) + 'rem'
    })
  }
});
通过上述插件代码的示例,可以看出整个流程还是很清晰的
- 重点对象:Root,Commont,AtRule,Rule, Declaration,Result;
- 遍历方法:walkCommonts,walkAtRules,walkRules,walkDels
8. postcss 的运用
- stylelint 的使用
- 扩展 stylelint 规则
- ...见代码
9. 参考文档
- http://api.postcss.org
- postcss API文档
- postcss 在线开发
- postcss 插件列表
bk