JavaScript 设计模式(一)
本文需要读者至少拥有基础的 ES6 知识,包括 Proxy, Reflect 以及 Generator 函数等。
至于这次为什么分了两篇文章,有损传统以及标题的正确性,是这样的。
其实放在一篇文章里也可以,但是希望读者能够更加轻松点,文章太长也会导致陷入阅读疲倦中。
因此希望读者理解。
1. 工厂模式
JavaScript 寄生模式就是一种 工厂模式,具体可以参考我的关于 JavaScript 继承 这篇文章,这里不再细谈寄生模式。
工厂模式是用工厂方法代替 new 的一种设计模式。
先看一个工厂模式的具体例子
class Product {
  constructor(name) {
    this.name = name;
  }
}

class Factory {
  static create(name) {
    return new Product(name);
  }
}

Factory.create("product1");
Factory.create("product2");
通过这种设计模式,我们可以少写一个 new
在 jQuery 源码中,这种设计模式也有体现
$('#div'); // 我们会这样传入一个 selector 返回一个 jQuery.fn.init 对象
下面我们具体看源码中的内容,以下是我简化过的源码
function jQuery(selector) {
  return new jQuery.fn.init(selector)
}

jQuery.fn = jQuery.prototype;				// 简化 原型方法 书写
jQuery.fn.eat = function() {
  console.log(`${this.name} eat!`);
  return this;
}

const init = jQuery.fn.init = function(selector) {
  this.name = selector;
}

// 使得 jQuery.fn.init.prototype 与 jQuery.prototype 保持一致
// 用以使用 jQuery.prototype 即 jQuery.fn 上定义的方法或属性
init.prototype = jQuery.prototype;

// 工厂模式
window.$ = function(selector) {
  return new jQuery(selector);
}

console.log($("huro").eat())
在 jQuery 实现的源码中,还是比较绕的,这种绕,其实这样隐隐约约的实现了组合寄生继承,分离了属性和方法。
因为这个时候属性例如 this.name 会在实例 new jQuery.fn.init() 上,
而这个实例的 __proto__ 指向 jQuery.prototype ,而我们是在 jQuery.prototype 上定义方法的,所以隐隐约约的,实现了属性的独立和方法的共享,节省了内存空间。

2. 单例模式
JavaScript 中没有很好的单例模式的实现,究其原因,是因为没有 private 关键字保护构造函数,现在最新的语法提案已经提出利用 # 字代表私有属性或方法,可能几年后就有了。如:
class Person {
    #name // 代表是一个私有属性
}
目前单例模式我们一般这样实现
class Singleton {
  eat() {
    console.log("huro eat!");
  }
}

Singleton.getInstance = (() => {
  let instance = null;
  return () => {
    if (instance === null) {
      instance = new Singleton();
    }
    return instance;
  };
})();

const obj1 = Singleton.getInstance();
const obj2 = Singleton.getInstance();
console.log(obj1 === obj2);
obj1.eat(); // huro eat!
这种设计模式在登录框或是注册框,只要是单一使用的场景,可以应用。
class LoginForm {
  constructor() {
    this.display = "none";
  }
  show() {
    if (this.display === "block") {
      console.log("already show!");
    }
    else {
      this.display = "block";
    }
  }
  hide() {
    if (this.display === "none") {
      console.log("already hide!");
    }
    else {
      this.display = "none";
    }
  }
}

LoginForm.getInstance = (() => {
  let instance = null;
  return () => {
    if (instance === null) {
      instance = new LoginForm();
    }
    return instance;
  }
})();

const login1 = LoginForm.getInstance();
const login2 = LoginForm.getInstance();

console.log(login1 === login2);
login1.show();
login2.show(); // already show!
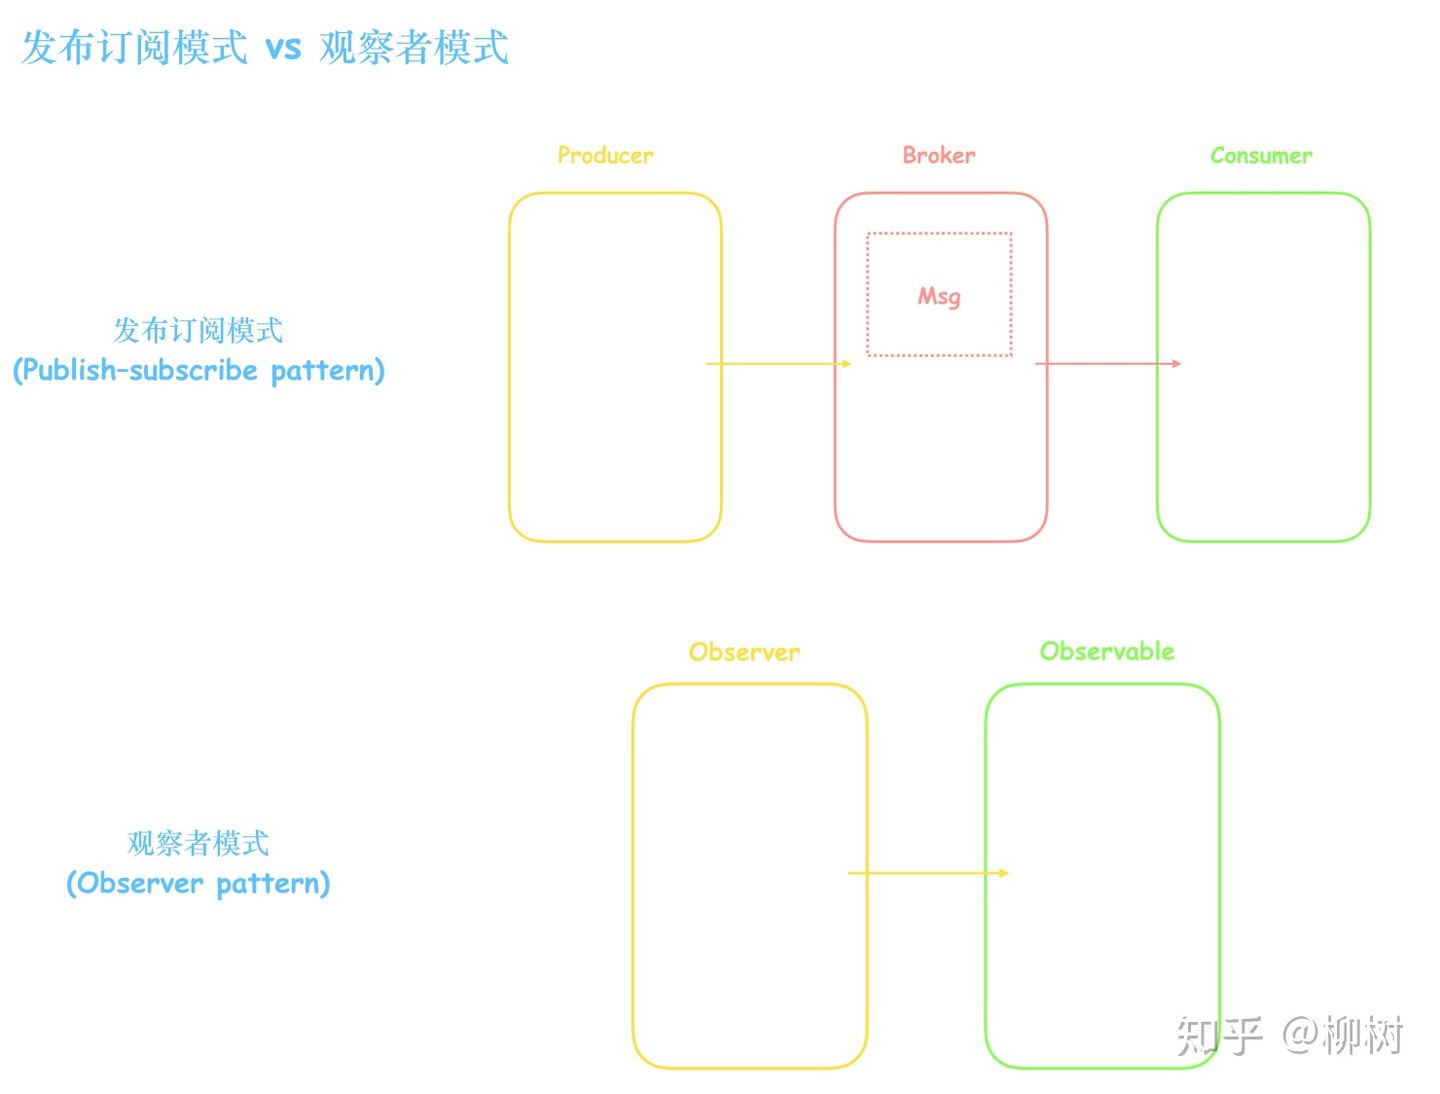
3. 观察者模式
类似于发布订阅,实际上就是当被观察者改变的时候通知观察者。
但是观察者模式是,观察者主动去调用被观察者的函数去观察。
发布订阅模式是,观察者(订阅者)去找一个中间商 (Bus) 去订阅。被观察者(发布者)要发布的时候也找那个中间商。只有中间商知道谁发布了谁订阅了,并及时推送信息。
这里借用柳树的一张图片,如果侵权,请联系我,我将立马删除。
具体观察者模式实现如下
// 观察者模式

// 被观察者
class Subject {
  constructor() {
    this.state = 0;
    this.observers = [];
  }
  change(fn) {
    fn();
    this.notifyAll();
  }
  increase(num) {
    this.change(() => {
      this.state += num;
    })
  }
  multiply(num) {
    this.change(() => {
      this.state *= num;
    })
  }
  notifyAll() {
    this.observers.forEach(observer => {
      observer();
    })
  }
  observe(fn) {
    this.observers.push(fn);
  }
}

class Observer {
  constructor({
    subject,
    name,
    fn
  }) {
    subject.observe(fn);
    this.name = name;
  }
}

const subject = new Subject();

const ob1 = new Observer({
  name: 'ob1',
  subject,
  fn: () => console.log("ob1 observe object")
})

const ob2 = new Observer({
  name: 'ob2',
  subject,
  fn: () => console.log("ob2 observe object")
})

subject.increase(2);
4. 发布订阅模式
class Emitter {
  constructor() {
    this.map = new Map();
  }
  on(name, fn) {
    if (!this.map.has(name)) {
        this.map.set(name, []);
    }
    const origin = this.map.get(name);
    this.map.set(name, [...origin, fn]);
  }
  emit(name) {
    const events = this.map.get(name);
    if (events === undefined) {
      return;
    }
    events.forEach(fn => {
      fn();
    })
  }
}

const emitter = new Emitter();

emitter.on('click', () => {
  console.log("huro");
})

emitter.on('click', () => {
  console.log("huro");
})

emitter.on('mousemove', () => {
  console.log("huro");
})

emitter.emit('click'); // huro huro
感觉有那味道了,好像这种实现有点类似于浏览器的 addEventListener 只不过 emit 是由用户的 click 等事件去触发的。
总结
本文共介绍了四种设计模式,并在源码层面上给与了实现,部分设计模式也给出了相应的例子,下篇文章中,会继续探讨四种设计模式,分别是 代理模式,迭代器模式,装饰器模式以及状态模式,并结合 Promise 实现, 对象的 for of 循环等进行探讨,欢迎读者阅读。
一篇文章图文并茂地带你轻松学完 JavaScript 设计模式(二)。
bk