前言:
最近在项目中遇到了遇到了写部署步骤过多的问题,为了减少.net core项目部署步骤;需要对一些基础问题进行验证:
如端口设置、单页应用程序(angluar)合并部署方式等相关问题,特将解决过程记录下来
一、.NET Core部署端口指定问题?
Kestrel 是 ASP.NET Core 项目模板指定的默认 Web 服务器。
那么在.NET Core中以Kestrel 作为作为web服务器有哪些方式能指定服务的监听端口呢?
- 方式1:环境变量设置:launchSettings.json文件中指定applicationUrl地址
修改launchSettings.json的配置项applicationUrl值:如下两种设置方式;多个地址用;分割

{
  "$schema": "http://json.schemastore.org/launchsettings.json","profiles": {
    "AuditLogDemo": {
      "commandName": "Project",
      "launchBrowser": true,
      "launchUrl": "swagger",
      "applicationUrl": "http://localhost:5000;https://localhost:5001",
      "environmentVariables": {
        "ASPNETCORE_ENVIRONMENT": "Development"
      }
    }
  }
}
运行结果:

在ConfigureWebHostDefaults中设置启动默认值时,使用UseUrls绑定地址;多个地址用;分割
public static IHostBuilder CreateHostBuilder(string[] args) =>
  Host.CreateDefaultBuilder(args)
    //改用Autofac来实现依赖注入
    .UseServiceProviderFactory(new AutofacServiceProviderFactory())
    .ConfigureWebHostDefaults(webBuilder =>
    {
      webBuilder.UseStartup<Startup>();
      webBuilder.UseUrls("http://*:5100;http://*:5101");
    });
运行如下:

此时:方式1的设置依然存在,说明优先级:方式2>方式1
- 方式3:配置文件设置(appsettings.json)-推荐
修改程序配置文件:添加以下节点:
{
    "Urls": "http://*:5200;https://*:5201"
}
运行效果:
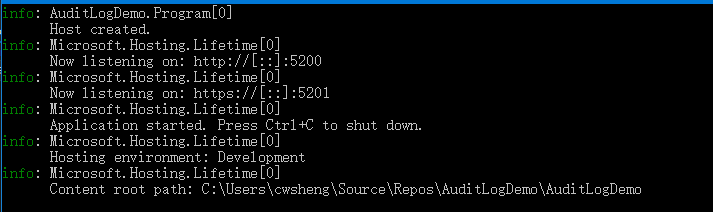
此时:方式1、方式2的设置依然存在,说明优先级:方式3>方式2>方式1
使用以下命令启动程序:
//项目根目录运行:
dotnet run --urls "http://*:5300;https://*:5301"

//编译输出命令运行
dotnet AuditLogDemo.dll --urls "http://*:5300;https://*:5301"
运行效果:
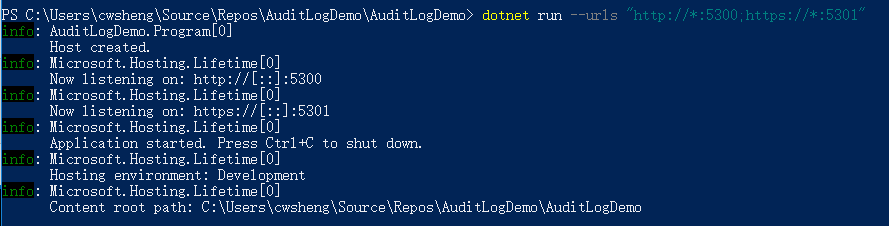
所以最后可以得出各种方式优先级为:
命令行配置(方式4)>配置文件方式(方式3)>程序指定(方式2)>环境变量配置(方式1)
二、Angular(单页应用程序)开发页面采用Kestrel 服务器运行
由于项目前期采用前后端分离实现,但在实施部署环节需要分成两个站点;给实施人员带来了多余的步骤。那么怎么解决这个问题呢?
1、添加包引用:Microsoft.AspNetCore.SpaServices.Extensions
Install-Package Microsoft.AspNetCore.SpaServices.Extensions
2、修改Startup.cs 文件中方法:
public class Startup
{
    public Startup(IConfiguration configuration)
    {
        Configuration = configuration;
    }public IConfiguration Configuration { get; }

    // This method gets called by the runtime. Use this method to add services to the container.
    public void ConfigureServices(IServiceCollection services)
    {
        services.AddSpaStaticFiles(configuration =>
        {
       //指定单页应用文件路径地址
            configuration.RootPath = "wwwroot/dist";
        });
     //……
    }

    // This method gets called by the runtime. Use this method to configure the HTTP request pipeline.
    public void Configure(IApplicationBuilder app, IWebHostEnvironment env)
    {
        app.UseStaticFiles();
     //
        app.UseSpaStaticFiles();
        app.UseEndpoints(endpoints =>
        {
            endpoints.MapControllers();
       //绑定路由;必须设置
            endpoints.MapControllerRoute(name: "default", pattern: "{controller}/{action=Index}/{id?}");
        });
        app.UseSpa(configuration =>{});
    }
}
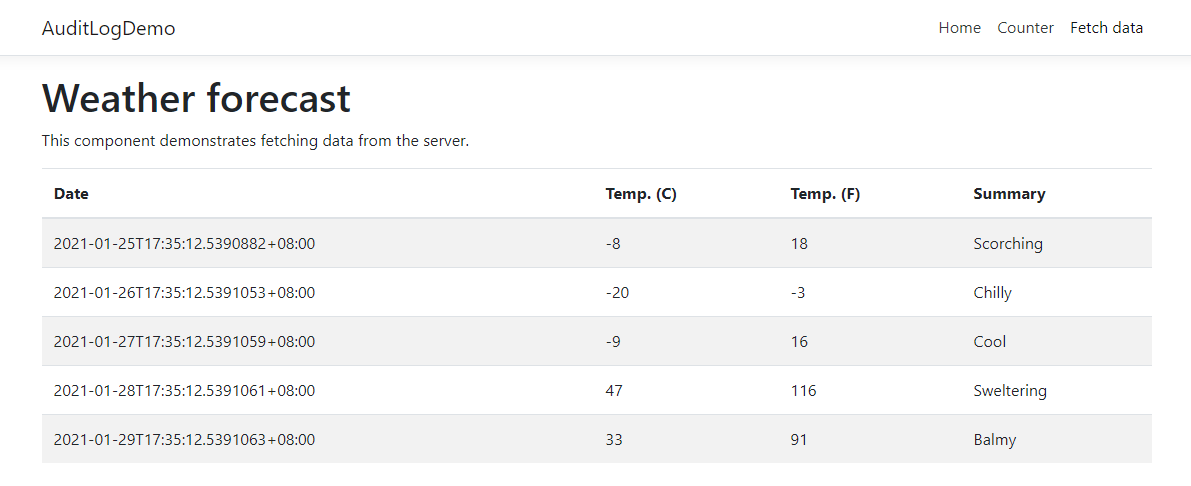
运行效果:
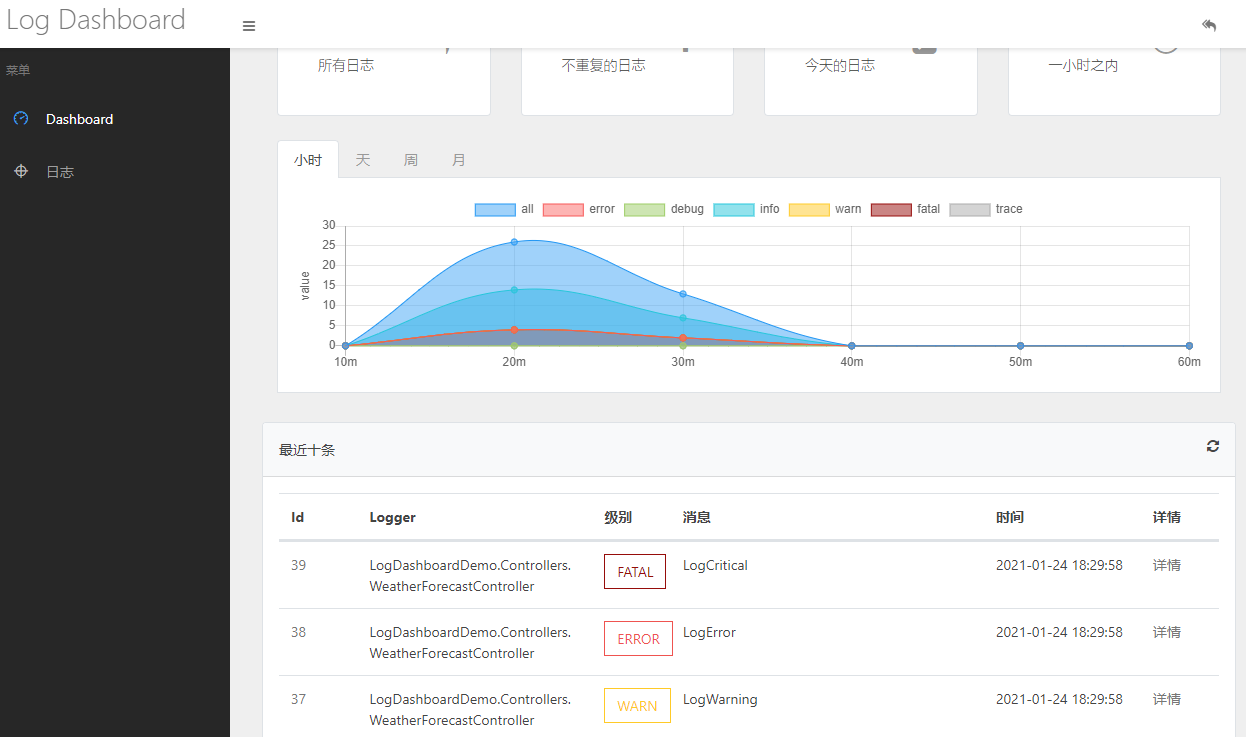
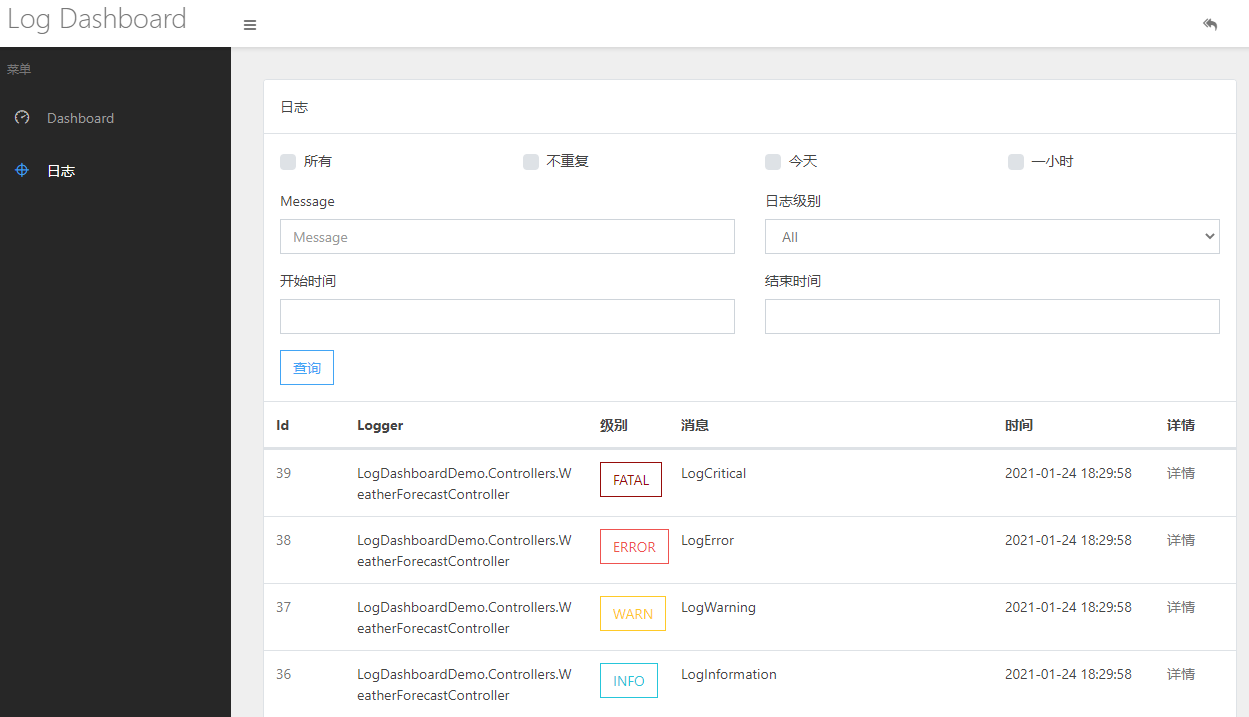
三、LogDashboard的使用
在项目中查看日志一直都是直接查看日志文件,那么有没有办法直接在页面中查看日志内容呢?
最近了解到一个开源项目:LogDashboard 采用中间件方式,提供了一个可以简单快速查看日志的面板。使用简单方便。
使用方式:
1、添加包引用:LogDashboard
Install-Package LogDashboard
2、在Startup中使用LogDashboard
public void ConfigureServices(IServiceCollection services)
{
    services.AddLogDashboard();
}


public void Configure(IApplicationBuilder app, IWebHostEnvironment env)
{
    //使用日志看板
    app.UseLogDashboard();
}
3、添加NLog及NLog配置文件
<?xml version="1.0" encoding="utf-8" ?>
<nlog xmlns="http://www.nlog-project.org/schemas/NLog.xsd"
      xmlns:xsi="http://www.w3.org/2001/XMLSchema-instance"
      autoReload="true"
      throwExceptions="false"
      internalLogLevel="Off" internalLogFile="c:\temp\nlog-internal.log">
  <variable name="myvar" value="myvalue"/>
  <targets>
    <target xsi:type="file" name="File" fileName="${basedir}/logs/${shortdate}.log"
            layout="${longdate}||${level}||${logger}||${message}||${exception:format=ToString:innerFormat=ToString:maxInnerExceptionLevel=10:separator=\r\n}||end" />
  </targets>
  <rules>
    <logger name="*" minlevel="Debug" writeTo="file" />
  </rules>
</nlog>
4、运行效果:
更加详细的使用方式:
https://doc.logdashboard.net/ru-men/quickstart
其他:
本篇文章示例源码:https://github.com/cwsheng/AuditLogDemo
bk