};
};
#这一段KEY内容来自rndc.conf,加上这段,好用rndc控制dns进程
include "C:\WINDOWS\system32\dns\etc\rndc.key";
controls {
inet 127.0.0.1 port 953
allow { 127.0.0.1; } keys { "rndc-key"; };
};
logging {
channel warning #下面内容会介绍新建dns_warnings.txt与dns_logs.txt
{ file "C:\WINDOWS\system32\dns\log\dns_warnings.txt" versions 3 size 1240k;
severity warning;
print-category yes;
print-severity yes;
print-time yes;
};
channel general_dns
{ file "C:\WINDOWS\system32\dns\log\dns_logs.txt" versions 3 size 1240k;
severity info;
print-category yes;
print-severity yes;
print-time yes;
};
category default { warning; };
category queries { general_dns; };
};
include "cnc.conf"; #将网通的IP地址范围数据,包含进来
view "view_cnc" { #判断如果是网通的地址范围,则会执行此处(读取cnc.def文件)
match-clients { CNC; };
zone "." {
type hint;
file "named.root";
};
zone "0.0.127.IN-ADDR.ARPA" {
type master;
file "localhost.rev";
};
include "C:\WINDOWS\system32\dns\etc\master\cnc.def"; #自定义域名,内容在cnc.def
};
view "view_any" { # 判断是非网通的ip地址范围,则会执行此处(读取telecom.def文件)
match-clients { any; };
zone "." {
type hint;
file "named.root";
};
zone "0.0.127.IN-ADDR.ARPA" {
type master;
file "localhost.rev";
};
include "C:\WINDOWS\system32\dns\etc\master\telecom.def";
};
3.4建立联通IP地址ACL策略文件
在WINDOWS\system32\dns\etc\建立cnc.conf文件
cnc.conf内容如下:
复制代码 代码如下:
# 2012-03-19 11:50 by liuguohua.com
#
acl "CNC" {
192.168.134.0/24;
192.168.145.0/24;
};
3.5自定义域名文件
在C:\WINDOWS\system32\dns\etc下新建master文件夹
在C:\WINDOWS\system32\dns\etc\master下新建四个文件cnc.def,telecom.def,
cnc_qq.com.txt,tel_qq.com.txt。
cnc.def内容
复制代码 代码如下:
zone "qq.com" {
type master;
file "C:\WINDOWS\system32\dns\etc\master\cnc_qq.com.txt";
};
telecom.def内容
复制代码 代码如下:
zone "qq.com" {
type master;
file "C:\WINDOWS\system32\dns\etc\master\tel_qq.com.txt";
};
cnc_qq.com.txt内容
复制代码 代码如下:
$TTL 3600
@ IN SOA ns1.qq.com. root.qq.com.(
2012031620 ;
3600 ;
900 ;
68400 ;
15 );
@ IN NS ns1.qq.com.
ns1 IN A 192.168.145.228
www IN A 112.90.180.1
tel_qq.com.txt内容
复制代码 代码如下:
$TTL 3600
@ IN SOA ns1.qq.com. root.qq.com.(
2012031602 ;
3600 ;
900 ;
68400 ;
15 );
@ IN NS ns1.qq.com.
ns1 IN A 192.168.145.228
www IN A 119.145.254.1
3.6建立日志文件
在C:\WINDOWS\system32\dns下新建log文件夹
在C:\WINDOWS\system32\dns\log下新建两个文件dns_logs.txt,dns_warnings.txt
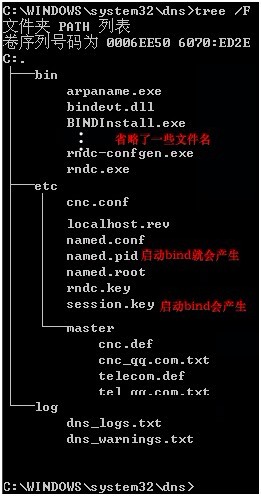
3.7 bind整体目录结构:

3.8 启动服务
3.8.1启动bind
到windows的服务管理工具里,找到ISC BIND服务,点右键进行启动,大家可以看到这个服务器是随操作系统启动而自动启动的,启动时用的帐号是named。


